AutoDataWorx pulls automotive aftermarket catalogs from your distributors into Shopify, keeps pricing and inventory current, and works out which distributor can fill each order that comes in.
This guide is for merchants. It covers installing the app, the first-run setup wizard, day-to-day operation, and what every setting does.
Before you start
You'll need three things:
- A Shopify store you own or have staff access to, with permission to install apps.
- At least one distributor account with API access: ASAP, Turn 14, Wheel Pros, MotorState, or Premier Performance. What you need is API or FTP credentials, not your web-portal login. See Chapter 2.
- An AutoDataWorx plan. The app uses Shopify Managed Pricing, so billing lands on your existing Shopify invoice.
The core idea
AutoDataWorx keeps a canonical catalog that's separate from your Shopify products. Distributor feeds flow into that catalog, and your settings decide what gets projected out to Shopify.
Distributors  ->  AutoDataWorx canonical catalog  ->  Your Shopify products
(ASAP,            (correlated across sources,         (only what your filters
 Turn 14,          deduplicated, ranked by             and publishing rules
 Wheel Pros,       source priority)                    allow through)
 MotorState,
 Premier)
Two things follow from that, and both are worth getting straight early:
- Nothing reaches your storefront until you allow it. Connecting a distributor publishes nothing at all. Enabling a brand starts a sync, and your publishing rules decide whether those products go live or land as drafts.
- The same part from two distributors is one product. The app correlates identical products across sources, then uses your source-priority ranking to decide which distributor supplies the price, the inventory, and the product content.
Chapter 01
Installation
Installing AutoDataWorx takes about a minute. You'll approve a set of Shopify permissions, then pick a plan. The setup wizard starts on its own once that's done.
1.1 Open the install link
Open the AutoDataWorx install link while you're logged into the Shopify admin for the store you want it on.
If you run more than one store, check the store name in the top-left of the Shopify admin first. Shopify will happily install the app on whichever store you happen to be signed into.
1.2 Review and approve permissions
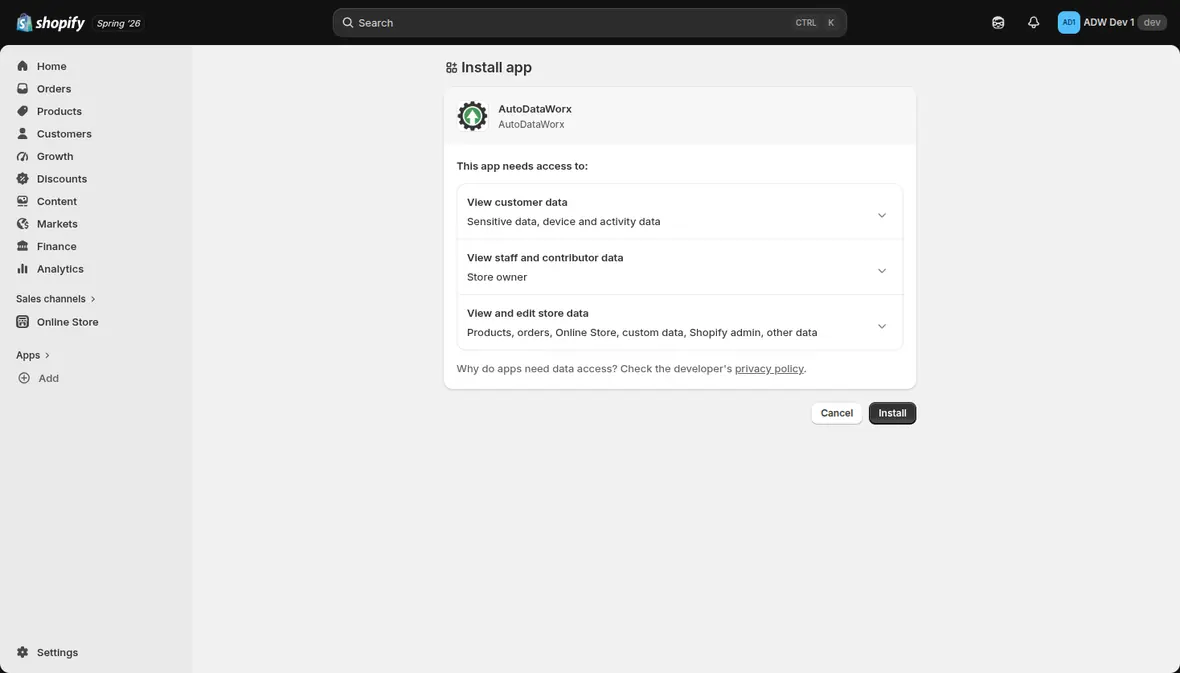
Shopify shows you what the app needs access to:
| Permission | Why AutoDataWorx needs it |
|---|---|
| View and edit store data — products, orders, Online Store, custom data | To create and update the products it syncs, read orders so it can route them to a distributor, and write fitment data |
| View customer data | To read the shipping address on an order so it can be submitted to the distributor for fulfillment |
| View staff and contributor data | To attribute manual actions (approvals, re-routes) in the activity log |
Click Install.
1.3 Choose a plan
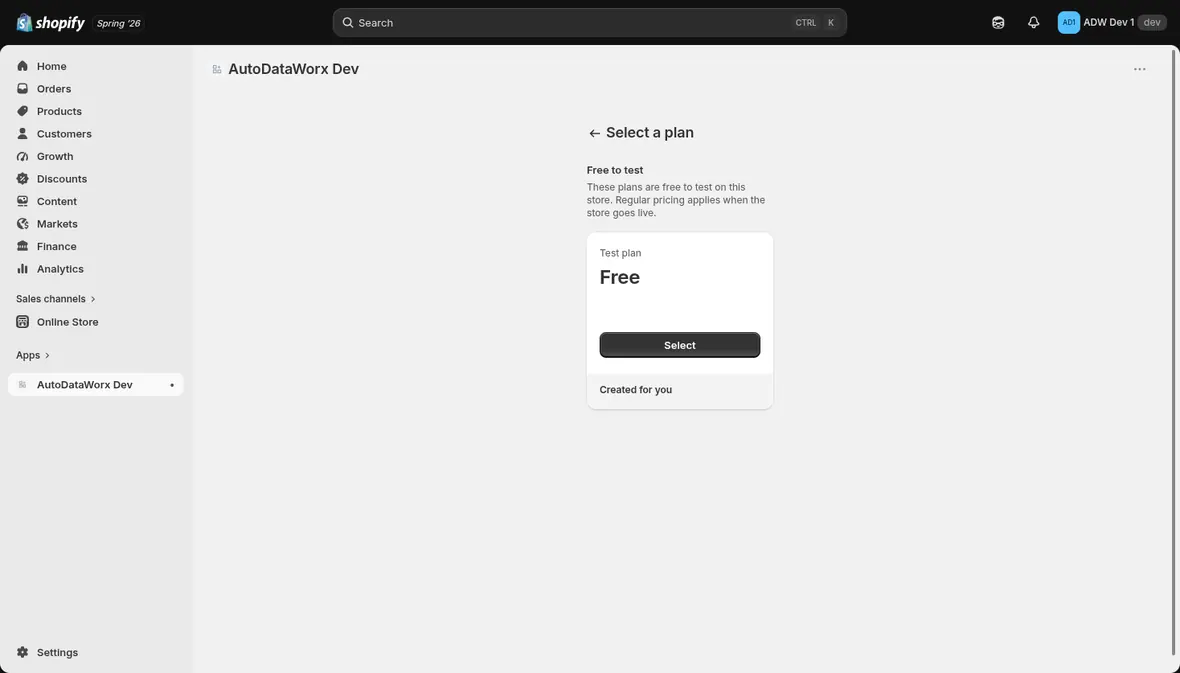
AutoDataWorx uses Shopify Managed Pricing. Shopify bills you on your regular Shopify invoice, so you never enter card details into AutoDataWorx.
Plans differ on one thing only: Basic connects ASAP, Plus connects any number of supported distributors. Every other feature — filters, fitment, exports, variant handling — is on both. Neither currently includes submitting orders to your distributor (Chapter 4).
Select your plan, then confirm on the approval screen:
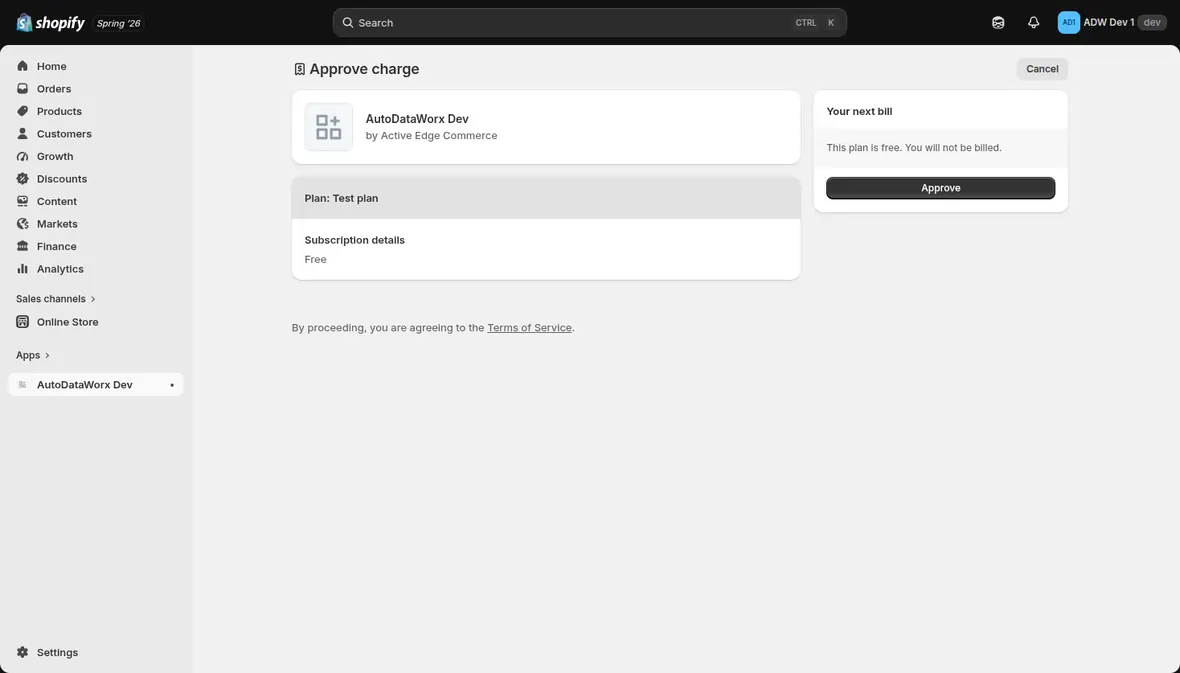
Click Approve. Shopify activates the subscription and drops you into the app.
Development stores. If you're installing on a Shopify development store, paid plans show as "Unavailable on dev stores" and can't be selected. A store needs a paid Shopify plan before it can approve a paid app subscription. Test plans, where they're offered, are marked "Free to test on this store", and regular pricing kicks in once the store goes live.
1.4 What happens next
You land on Step 1 of the setup wizard. Nothing has synced yet and no products exist — so far the app has only registered itself with your store.
Continue to Chapter 2: Setup wizard.
Troubleshooting installation
A blank screen or "page not found" after clicking the install link. You were probably signed into a different store, or into no store at all. Sign into the right Shopify admin, then reopen the install link.
The app keeps returning you to the plan-selection screen. Your subscription isn't active. Shopify blocks the app from loading until a plan is approved. Reopen the app from Apps in the Shopify admin and finish the approval. If your store is a development store, see the note in 1.3.
"No active subscription" banner inside the app. The plan was canceled, or it never activated in the first place. Go to Settings → Plan and click Open billing page to resubscribe. Syncing stays paused until there's an active plan.
Chapter 02
Setup wizard
The wizard runs once, on first open, and has six steps. It appears automatically after installation. You can leave and come back without losing anything, since progress is saved, and you can reopen it any time from Onboarding in the app's navigation.
Every step carries the same reminder:
Nothing reaches your storefront until the final step.
Take that at face value. Connecting a distributor, choosing filters, setting publishing rules — all of it happens before anything syncs. Products only start flowing when you enable a brand at Step 5.
| Step | Screen | What you decide |
|---|---|---|
| 1 | Add your first connector | Which distributor, and its credentials |
| 2 | Connect a catalog source | Which source supplies product content |
| 3 | Publishing | Whether products auto-publish, to which channels, at what status |
| 4 | Filters | Which products are excluded, store-wide |
| 5 | Configure brands and sync | Which brands sync, how often, default markup |
| 6 | Setup complete | Review and finish |
Step 1 — Add your first connector
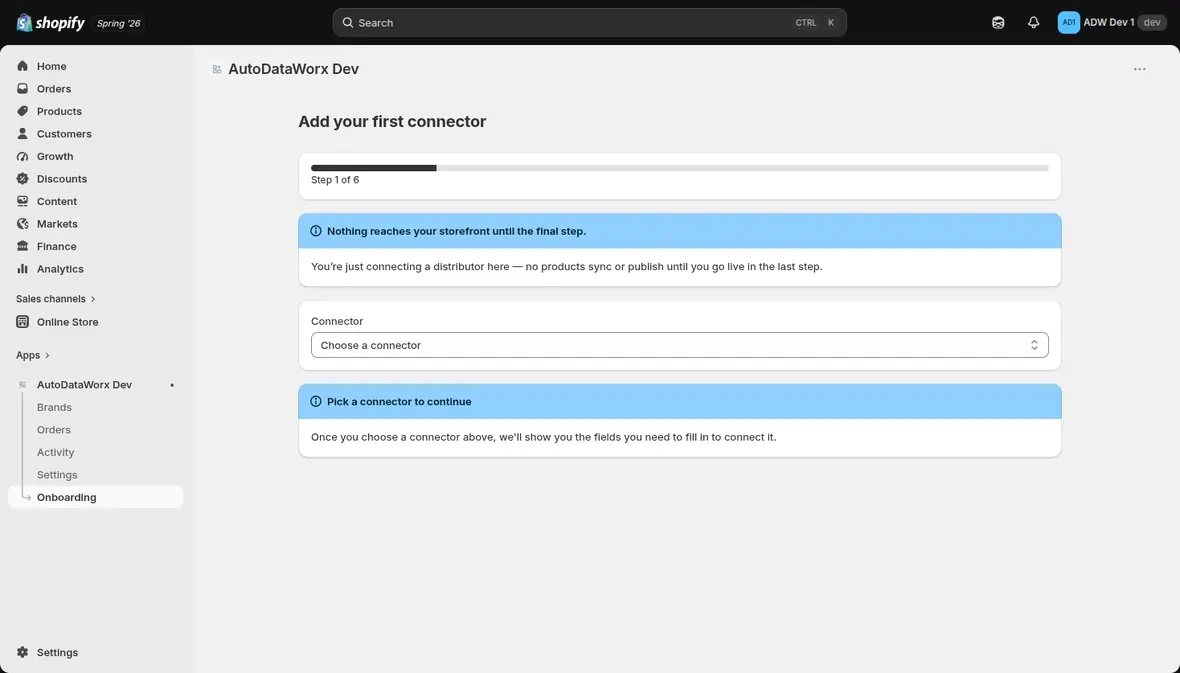
Pick your distributor from the Connector dropdown. Five are supported:
| Distributor | Credentials required |
|---|---|
| ASAP Network | API token (a bearer token) |
| Turn 14 | Client ID and Client secret |
| Wheel Pros | SFTP username and password |
| MotorState | FTP username, FTP password, and API key |
| Premier Performance | FTP username and password |
Selecting one reveals its credential fields.
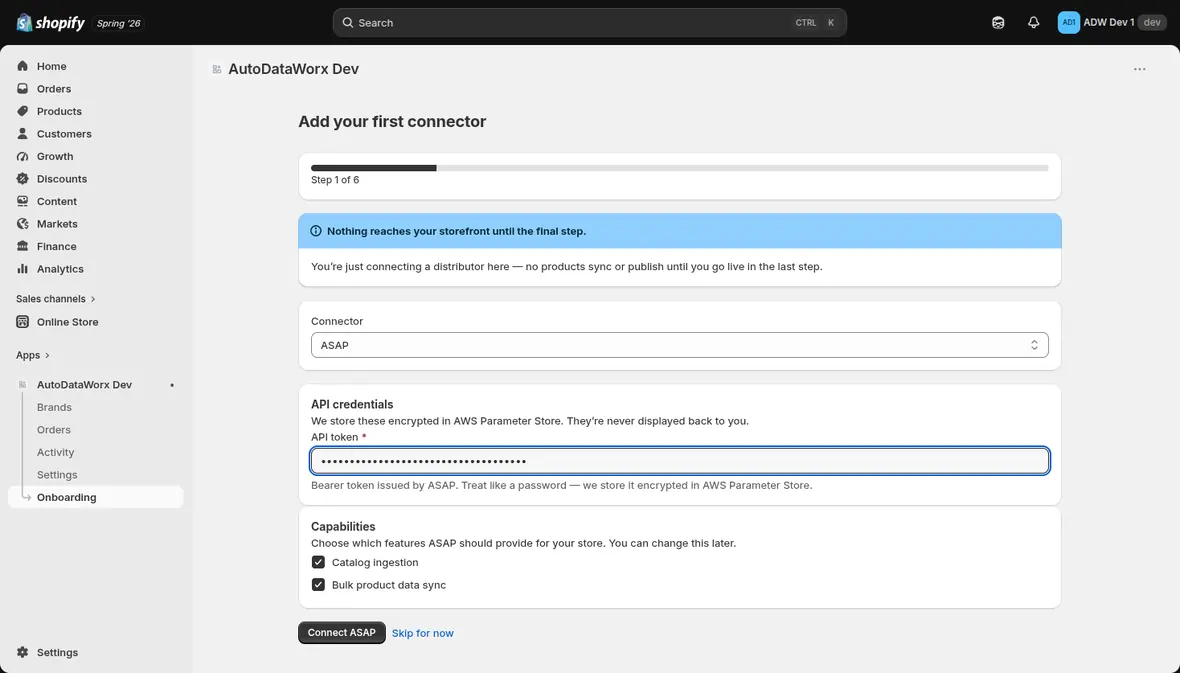
Use API credentials, not your portal login. Every distributor issues API credentials separately from the username and password you use on their website. If you don't have them, ask your distributor account rep for API access.
Credentials are encrypted and stored in AWS Parameter Store. The app never shows
them back to you: later screens display ••••• with a Reveal button that's
guarded by your Shopify session.
Capabilities let you choose what this connector is allowed to provide. ASAP offers Catalog ingestion and Bulk product data sync. Turn 14 adds Inventory, Pricing, Order submission and Health check. Wheel Pros, MotorState and Premier Performance each offer Catalog ingestion, Bulk product data sync, Pricing and Inventory. Leave them all on unless you've got a specific reason not to; you can change this later in Settings → Connectors.
How many distributors you can connect depends on your plan. Basic connects ASAP only; Plus connects any of the five. See Chapter 4.
Click Connect. The app validates the credentials on the spot and shows a green check per capability. If validation fails, nothing is saved and an error tells you what went wrong.
There's also Skip for now, though no catalog can sync until you've connected at least one distributor.
Step 2 — Connect a catalog source
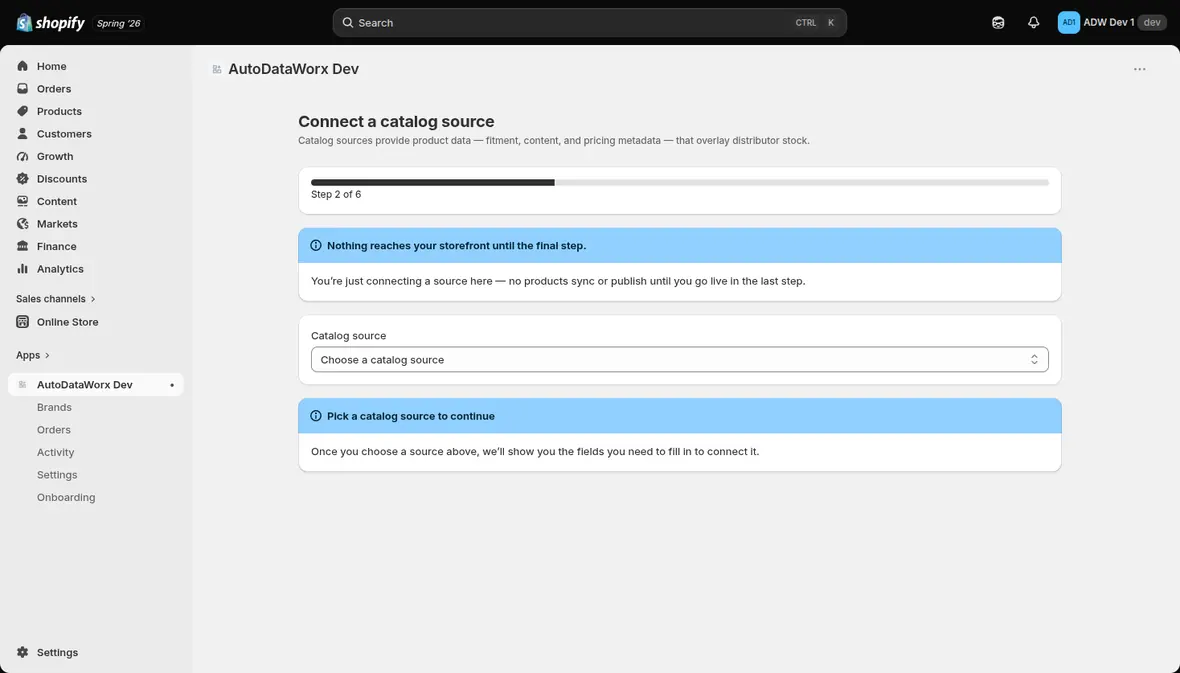
A catalog source supplies the product content that overlays distributor stock: fitment, descriptions, images and pricing metadata.
Pick your source from the dropdown. If you already connected it at Step 1, the app reuses those credentials and just confirms:
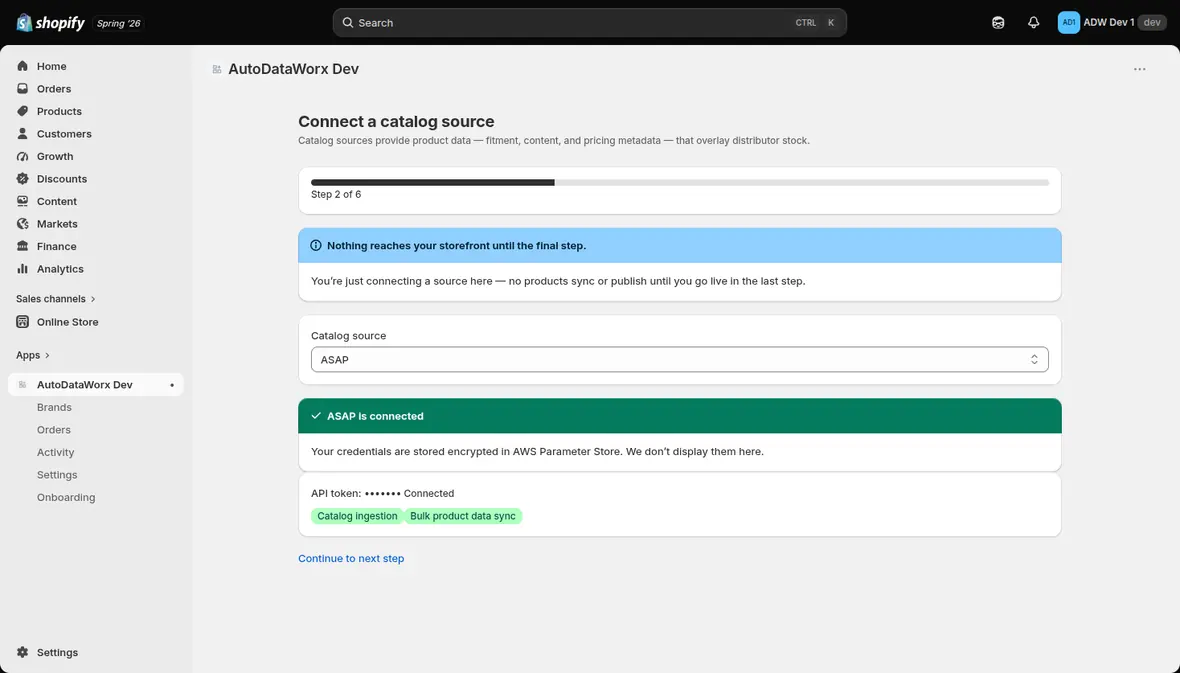
Both capability checks (Catalog ingestion, Bulk product data sync) need to pass. Click Continue to next step.
Step 3 — Publishing
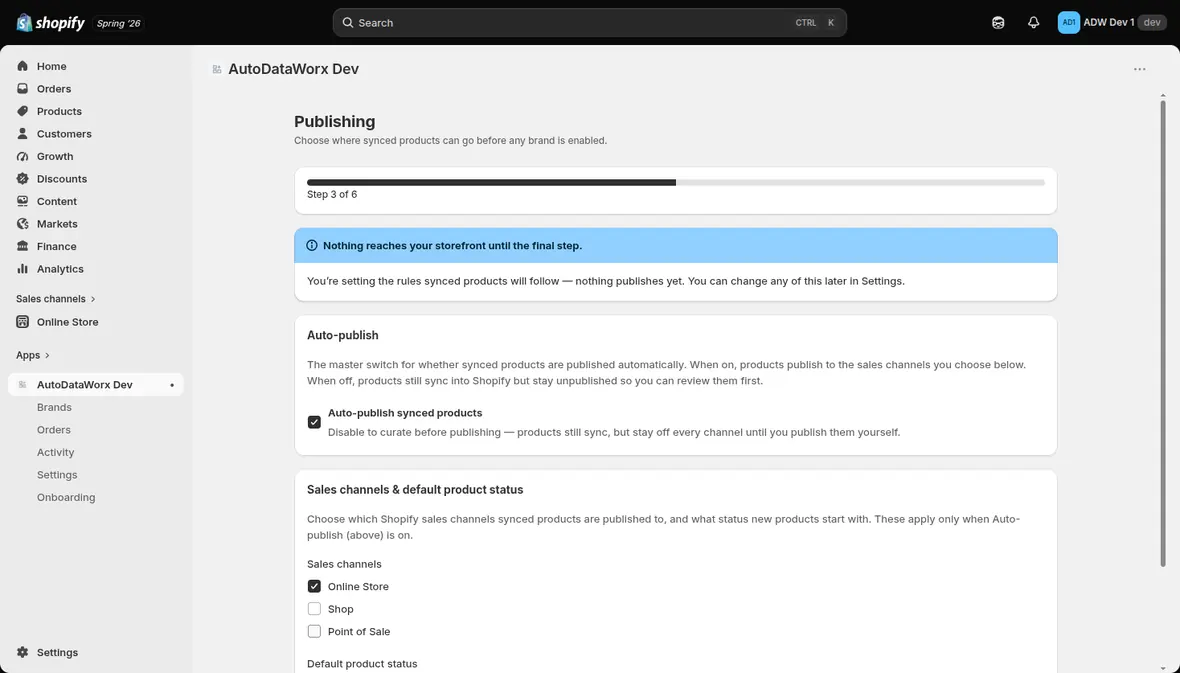
This is where you decide whether synced products go live on their own.
Auto-publish synced products is the master switch:
- On — products publish to the sales channels you select below as they sync.
- Off — products still sync into Shopify but stay off every channel, so you can look them over before publishing them yourself.
Sales channels — where products appear: Online Store, Shop, Point of Sale. Select none and products won't appear anywhere.
Default product status — the status new products are created with:
- Active — published immediately.
- Draft — hidden until you review and set them Active.
Status and channels work independently. A product synced as Draft isn't visible to customers on any channel, no matter what your channel selection says. Only Active products are visible.
Onboarding a large catalog for the first time? A cautious combination is Auto-publish on, Online Store selected, Default status Draft. Products land in Shopify ready for review, and you publish in bulk once you're happy with them.
Build collections from my catalog
The last control on this step is an opt-in for automatic collections: given your synced catalog, AutoDataWorx can create Shopify collections for the vehicle makes and product types it finds — a Ford collection, a Lift Kits collection — so your storefront has working navigation instead of an empty Collections page.
It's off by default, and ticking it here creates nothing. At this point in the wizard no brand has been enabled, so there is no catalog to build a collection from. All this does is record the preference. Once your products have synced you go to Settings → Collections, where you see exactly what would be created with product counts and pick the ones you want.
Leave it off if you already curate your own collections. On a large catalog this can create dozens at once, sitting alongside the ones you built yourself. Chapter 4 covers the whole feature.
Click Save and continue.
Step 4 — Filters
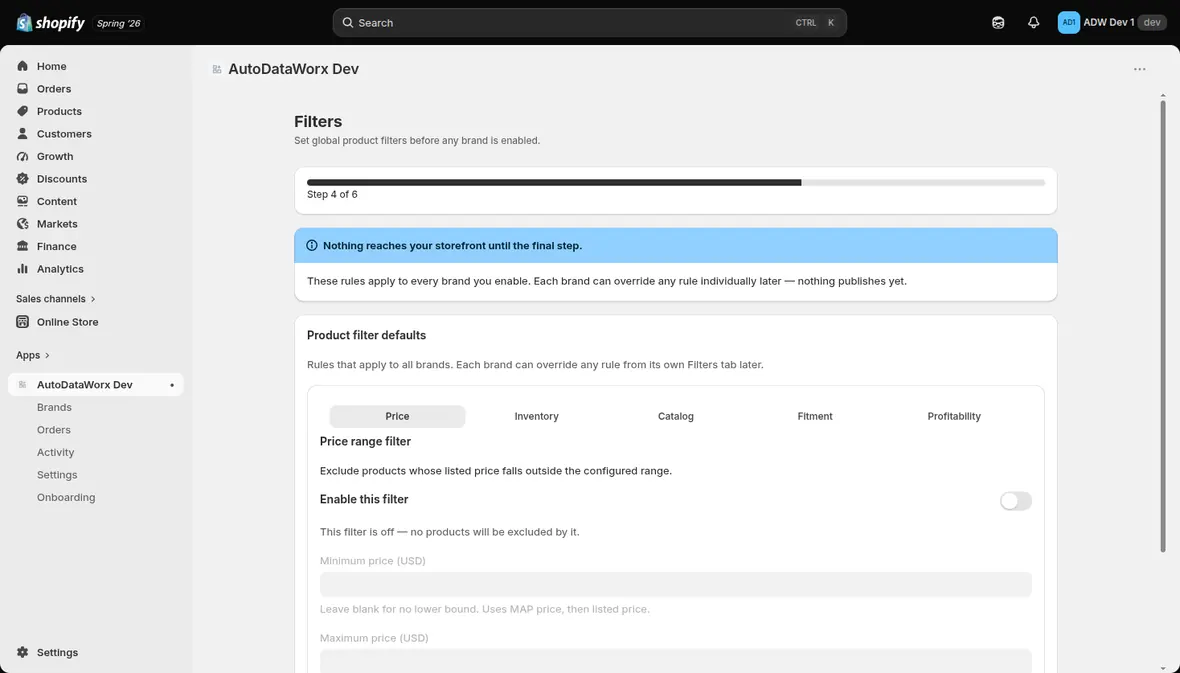
Filters decide which products get excluded from your store. They apply to every brand you enable, and any brand can override them later from its own Filters tab — though a brand override replaces these settings for that brand rather than adjusting them, so it's worth reading Chapter 4 before you set one.
Every filter starts off, so with none enabled you'll sync everything a brand offers. Each one has its own Enable this filter toggle, a Save filter button, and a Preview effect button that shows what the filter would exclude without actually applying it. Use Preview before you save.
There are five tabs:
Price
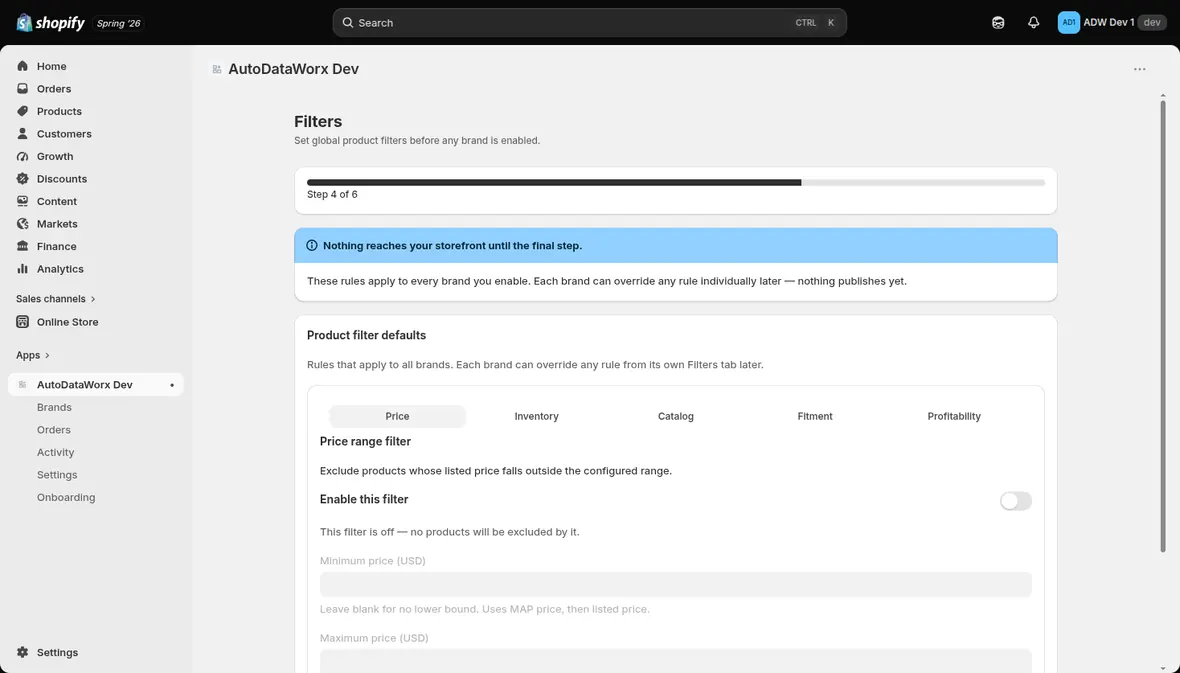
Excludes products priced outside a range. Set a minimum, a maximum, or both, and leave a field blank for no bound. Uses MAP price first, then listed price.
Inventory
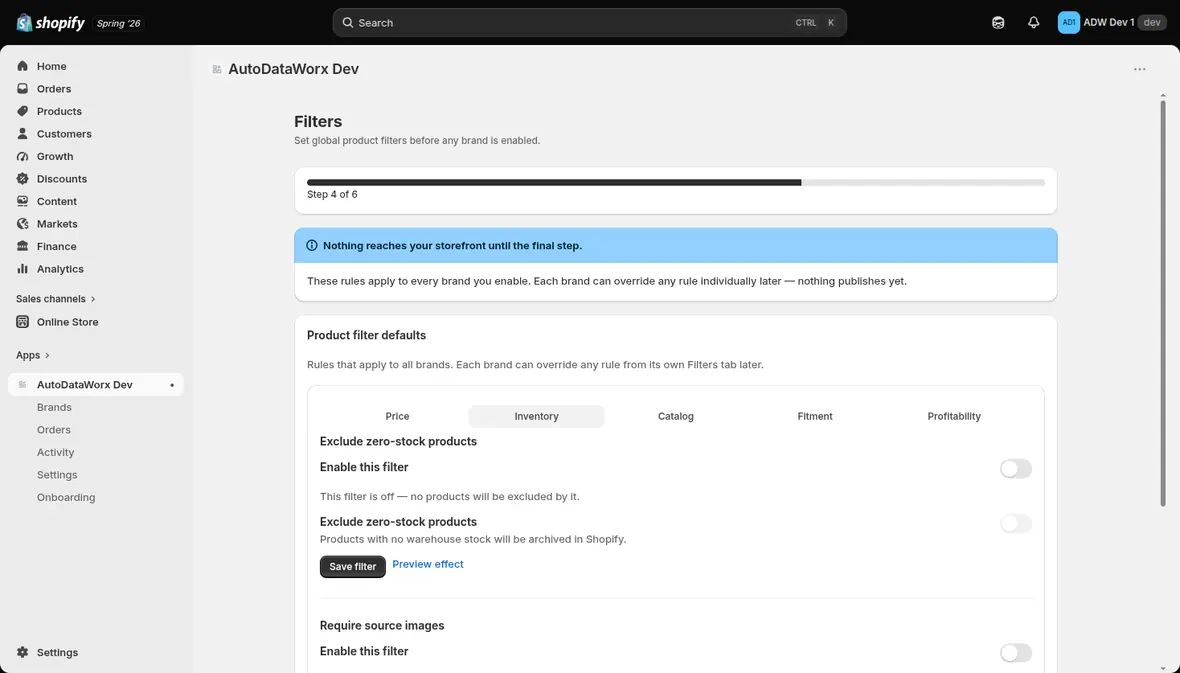
Two independent rules:
- Exclude zero-stock products — products with no warehouse stock get archived in Shopify.
- Require source images — products with no images from any distributor get archived.
The fallback image you configure in Settings → Storefront & exports does not count as a source image here. It's applied after filtering.
Catalog
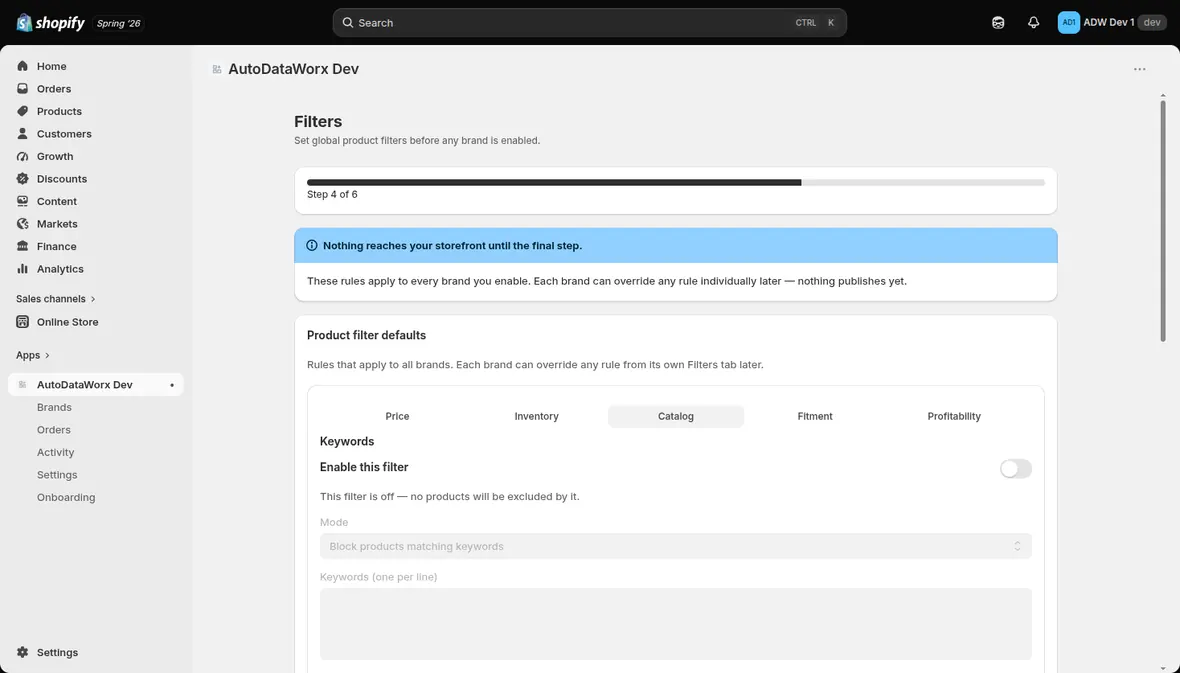
Three rules, each with a block or allow-only mode:
- Keywords — match against Title, Description, or both.
- Categories — block or allow specific categories.
- Part Numbers — block or allow specific part numbers.
Enter one value per line.
Fitment
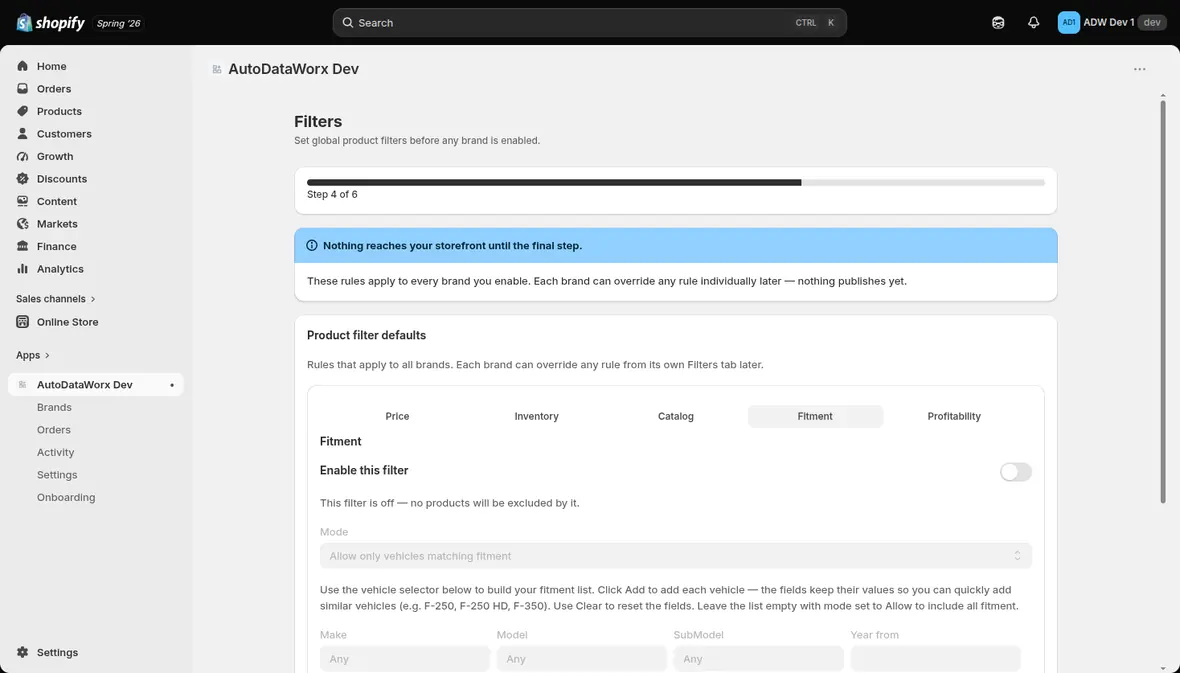
Restricts your catalog to specific vehicles. This is the filter most automotive merchants care about.
Set the mode to Allow only vehicles matching fitment or Block vehicles matching fitment, then build a vehicle list with the Make / Model / SubModel / Year-from / Year-to selector. Click Add for each vehicle. The fields hold onto their values so you can rattle off similar vehicles quickly (F-250, F-250 HD, F-350). Clear resets them.
- Leave a field blank and it becomes a wildcard.
- Leave the list empty with mode Allow and all fitment is included.
- Include universal-fit products controls whether parts your distributor explicitly flagged as universal-fit (which match every vehicle) come along.
- Products with no fitment data decides what happens to parts your distributor told you nothing about — no vehicle list and no universal-fit flag. Three choices: Hold them until fitment data arrives (the default — they show as Pending first sync), Treat them as universal-fit, or Don't publish them.
Those last two settings compose, and the combination can surprise you. "Treat them as universal-fit" doesn't publish anything by itself — it reclassifies the product, and Include universal-fit products then decides its fate. With that switch off, choosing "Treat them as universal-fit" excludes the product rather than publishing it. To publish no-fitment products you need both. The help text under the control tells you which combination you're currently in, and Chapter 6 works through it in full — read it before changing this on a brand whose distributor sends no fitment data at all.
The filter also trims what publishes, not just which products publish. A part fitting both Silverado and F-150 passes a Chevrolet-only rule, because it does fit a Chevrolet. The Ford rows are then stripped from that product, so you don't get
make:fordtags or Ford lines in the fitment data for a vehicle you filtered out. Universal-fit parts are exempt.
Profitability
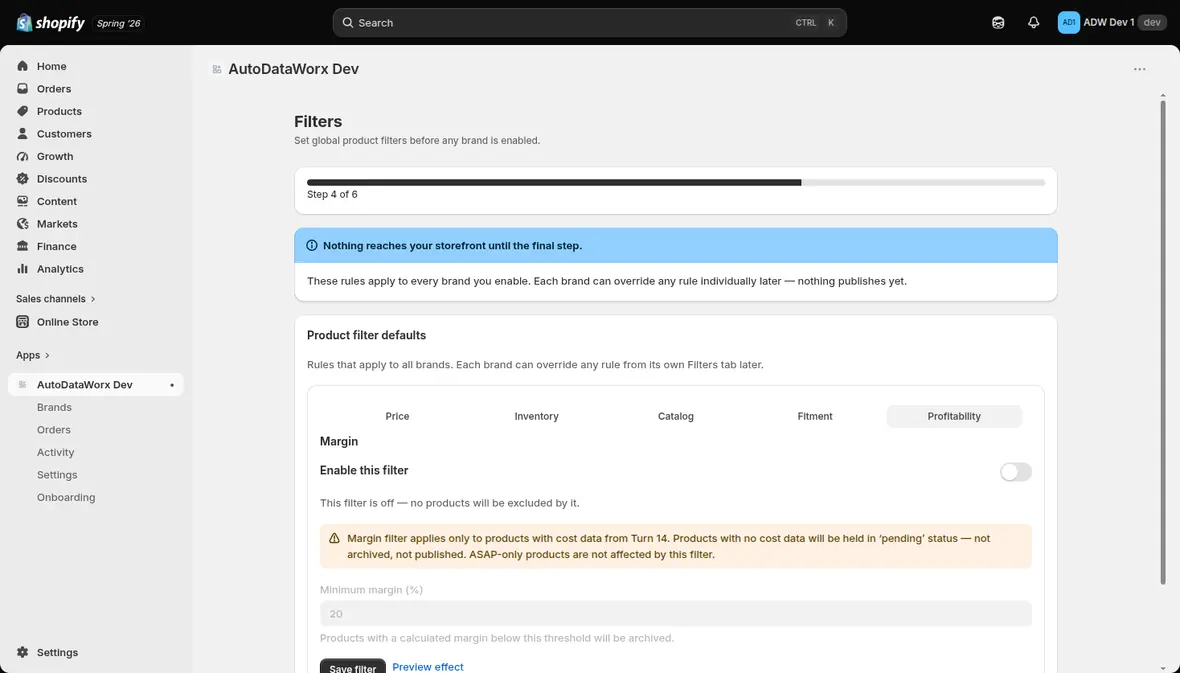
Sets a minimum margin (%). Anything below the threshold gets archived.
This filter only applies to products with cost data from Turn 14. Products without cost data sit in pending status, neither archived nor published. ASAP-only products aren't affected.
Click Continue to next step.
Step 5 — Configure brands and sync
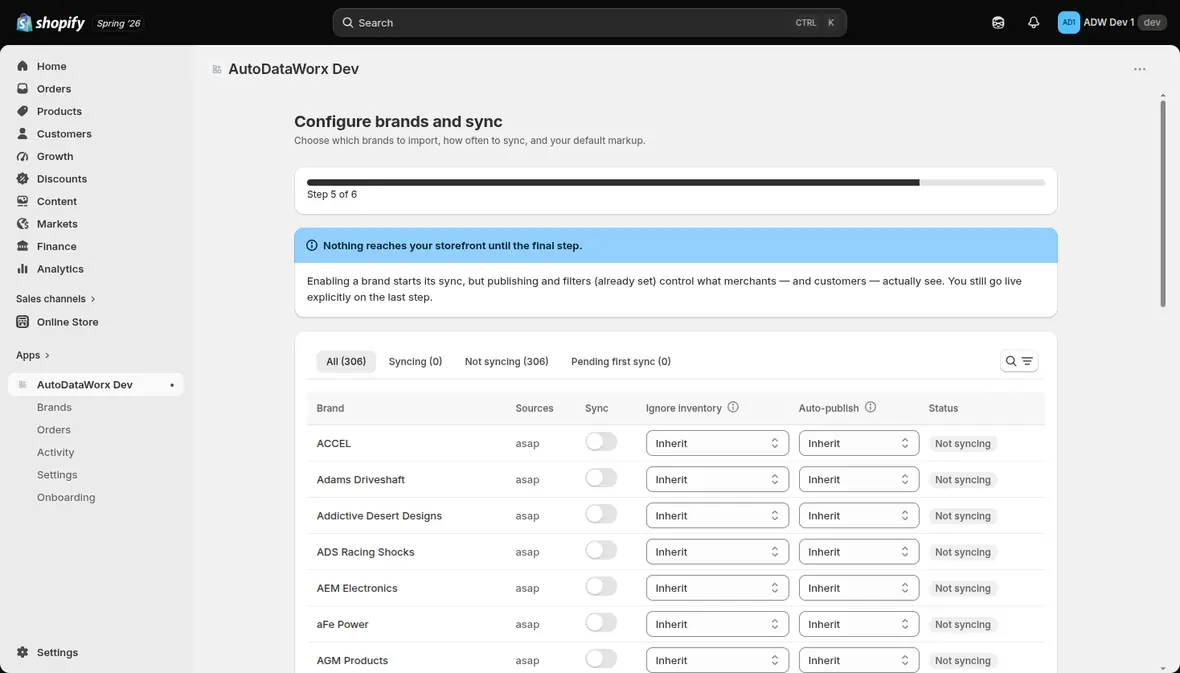
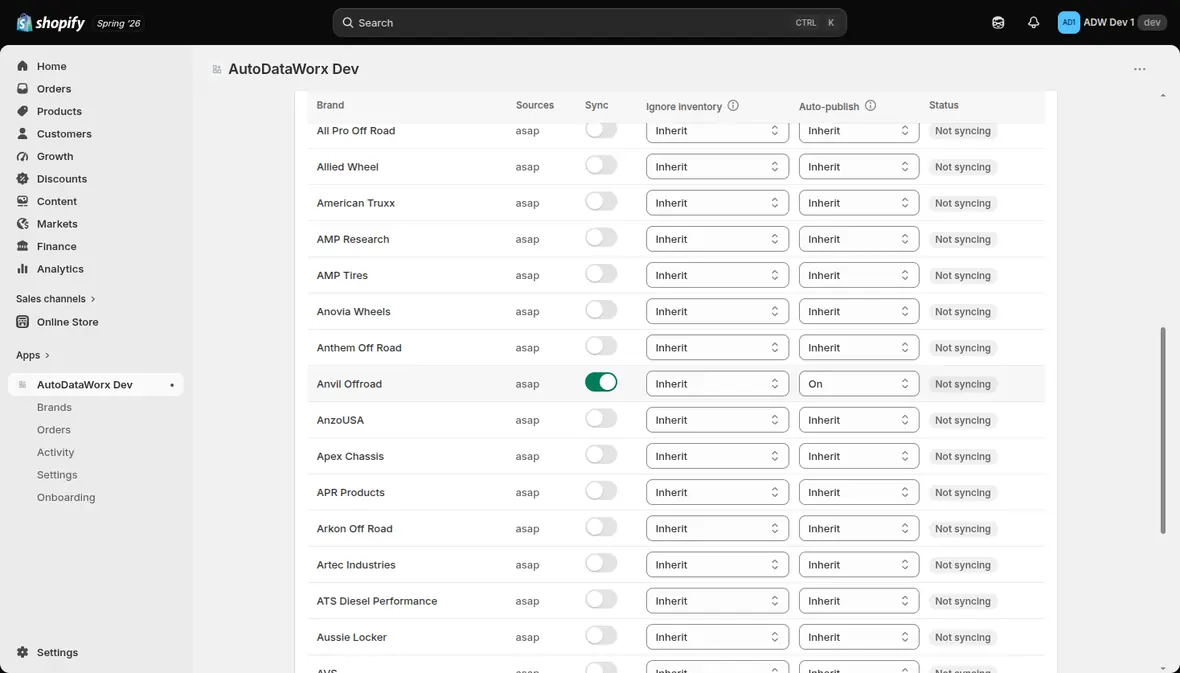
The brand list shows every brand your distributor credentials entitle you to. Tabs across the top narrow it down: All, Syncing, Not syncing, Pending first sync.
For each brand you can set:
| Column | Meaning |
|---|---|
| Sync | The master on/off for this brand. Turning it on starts the first import. |
| Ignore inventory | Inherit / On / Off — when On, products are never archived for zero stock |
| Auto-publish | Inherit / On / Off — overrides the store-wide setting from Step 3 |
| Status | Current sync state |
Inherit means "follow the store-wide default", which is almost always what you want until you have a reason to differ.
Each brand also lists the sources backing it. Turn 14 sources carry a purchase-authorization badge — Ready, or Not authorized — contact your rep — and a brand whose only source is an unauthorized Turn 14 shows "Enabling won't create products yet — no authorized source". That's a distributor-side permission, not an app error; see Chapter 3.
Below the list:
- Sync cadence — how often the app re-checks your distributors. You can pick every 1, 4, 12 or 24 hours; every 4 hours is recommended. It applies to all sources, and you can override it per source afterwards.
- Default markup over cost (%) — used only when both MAP and MSRP are missing. When pricing data exists, the app always follows the MAP → MSRP → markup-over-cost cascade.
Start with one small brand. Enable a large brand as your first sync and you'll wait a long time before finding out whether your settings were right. Turn on one modest brand, check the products look correct in Shopify, then enable the rest.
Click Save & continue (or Skip — configure brands later).
Step 6 — Setup complete
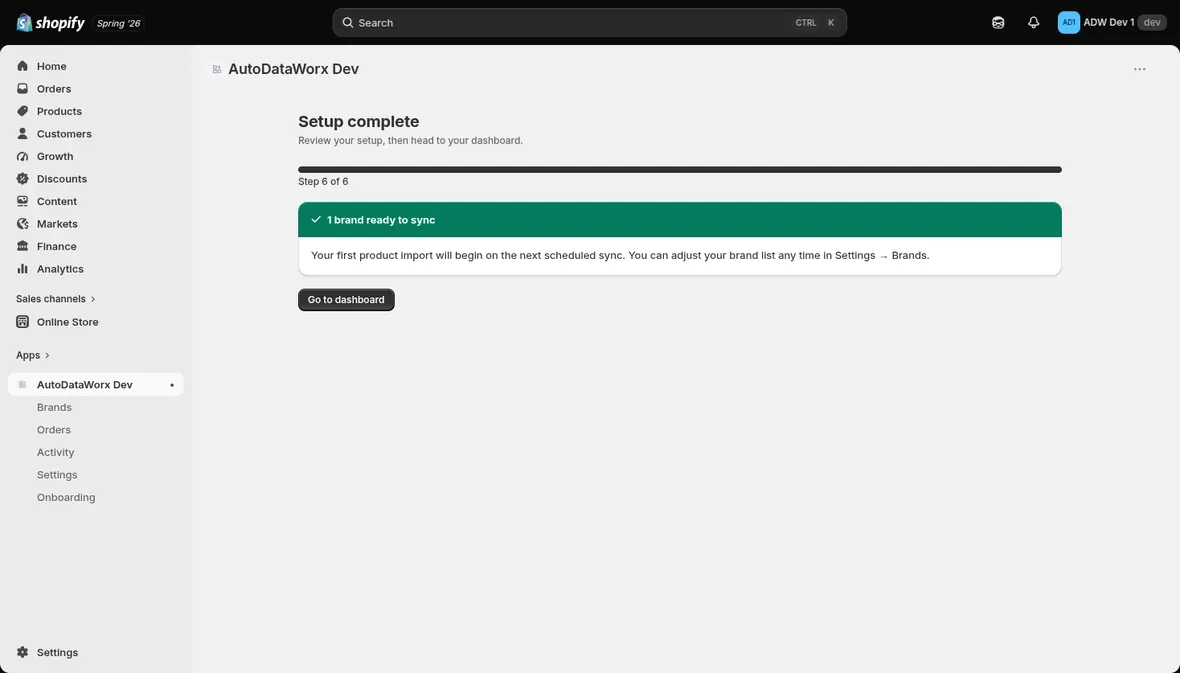
The app confirms how many brands are ready to sync. Enabling a brand kicks off its first import right away, and later syncs follow the cadence you chose.
Click Go to dashboard.
Verifying the first sync
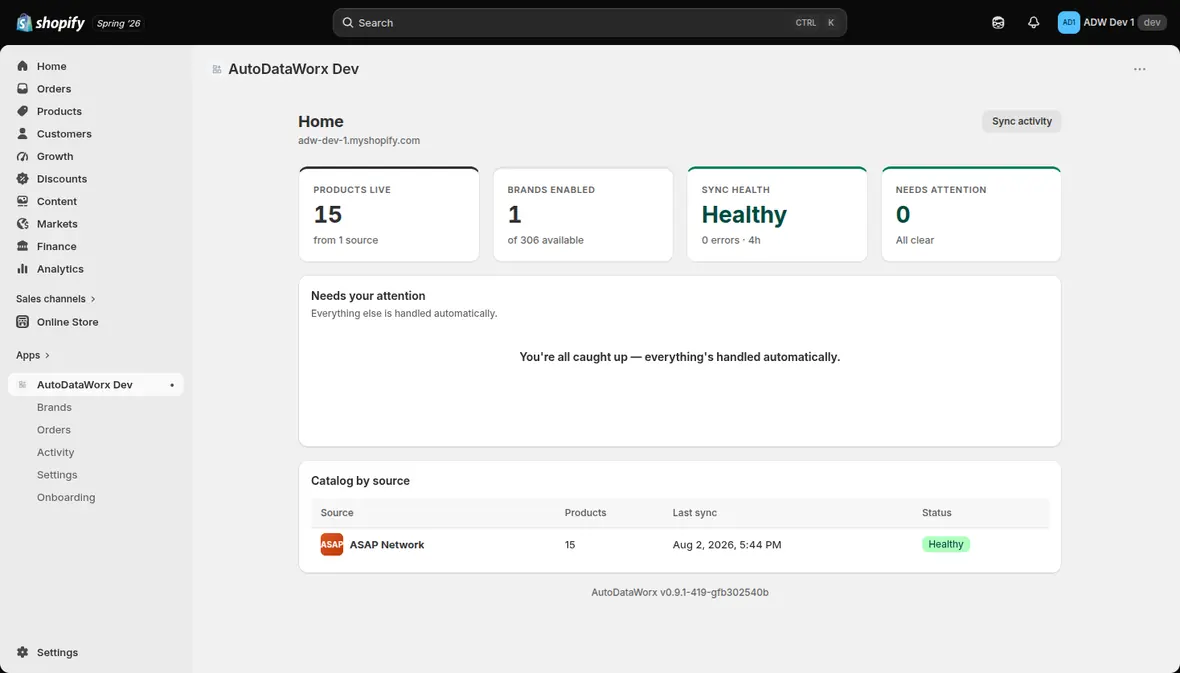
Within a few minutes the dashboard shows products live:
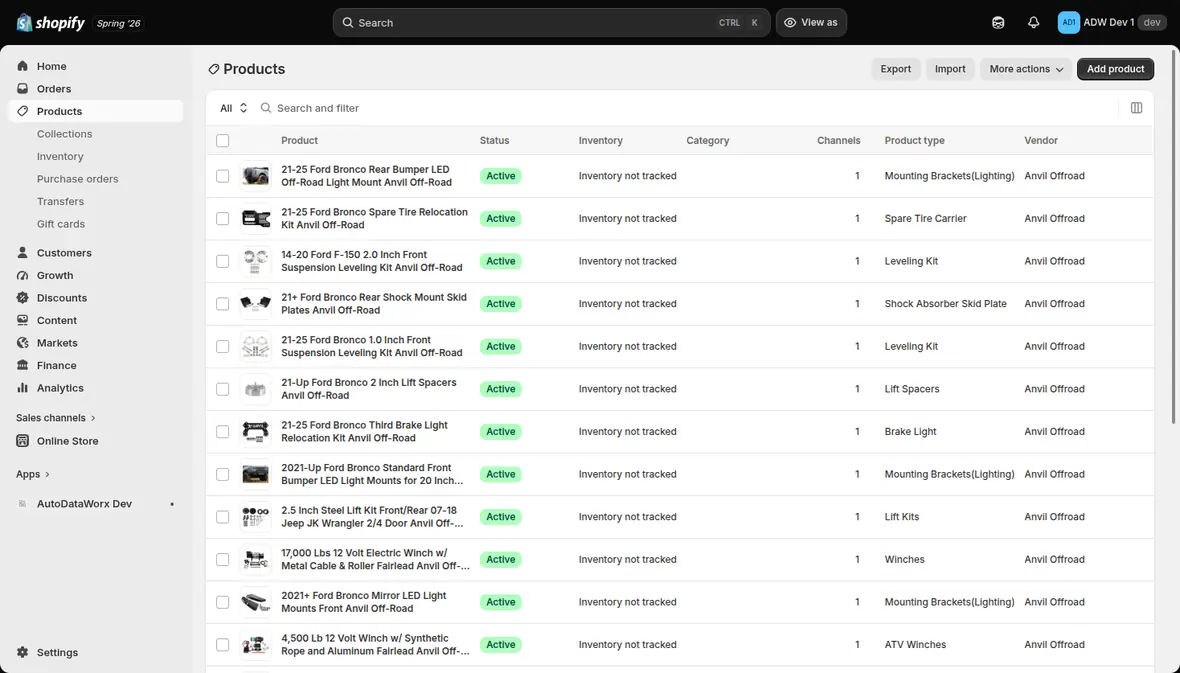
And the products turn up in Shopify with images, prices, categories, product types and your brand as the Vendor:
If nothing's appeared after ten minutes or so, head to Chapter 5: Troubleshooting.
Chapter 03
Daily operation
Once setup is done, AutoDataWorx mostly runs itself. This chapter covers the screens you'll actually use.
The app's navigation has seven entries: Home, Brands, Orders, Activity, Settings, Onboarding, and User guide — the last one opens this guide inside the app, and has an Open in new tab action if you'd rather keep it beside your work.
3.1 Home
Four tiles summarize the state of your catalog:
| Tile | What it tells you |
|---|---|
| Products live | How many products are currently projected to Shopify, and from how many sources |
| Brands enabled | How many brands are syncing, out of those available to you |
| Sync health | Healthy or an error count, plus your sync cadence |
| Needs attention | Items requiring a decision from you — normally zero |
Needs your attention lists anything the app couldn't resolve on its own. An empty list means everything is being handled automatically.
Catalog by source breaks the catalog down per distributor, with the last sync time and status for each.
The app version sits at the bottom of the page. Quote it when you contact support.
3.2 Brands
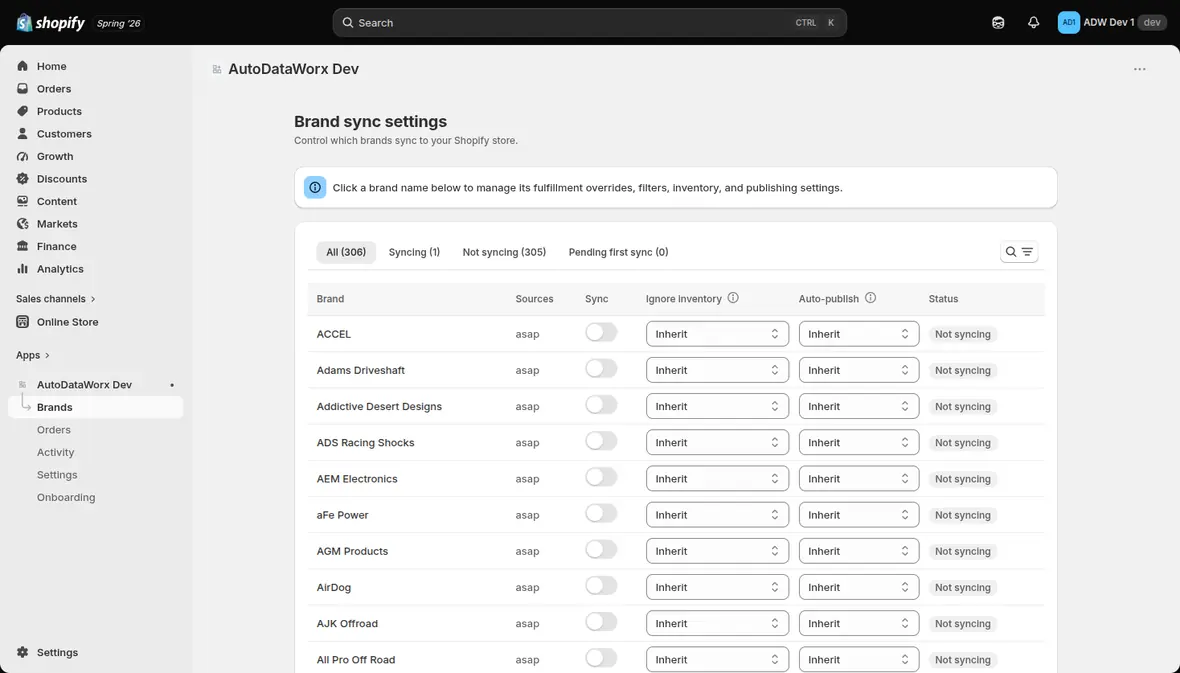
The full brand list, with the same controls as wizard Step 5: Sync, Ignore inventory, Auto-publish and Status. The tabs narrow it to Syncing, Not syncing, or Pending first sync.
This is where you turn brands on and off as your distributor agreements change.
Purchase authorization
Each row lists the sources that back the brand. Turn 14 draws a distinction the other distributors don't: carrying a brand's catalog data and being authorized to buy from it are separate permissions, and you can have the first without the second. Turn 14 sources therefore carry a badge:
| Badge | Meaning |
|---|---|
| Ready | Turn 14 has approved you to purchase this brand |
| Not authorized — contact your rep | Turn 14 supplies the data but hasn't approved you to buy |
| (no badge) | This source has no purchase-authorization concept — nothing to check |
ASAP, Wheel Pros, MotorState and Premier have no equivalent gate, so they never show a badge and always count as authorized.
When none of a brand's sources is authorized, the row warns "Enabling won't create products yet — no authorized source" before you flip the switch. The brand isn't broken and neither is the app: your distributor hasn't granted you access. Contact your Turn 14 rep, then run Refresh entitlements on that connector (Settings → Connectors).
A brand carried by two sources is fine as long as one is authorized. An ASAP brand that Turn 14 hasn't approved you for still produces products, because ASAP is supplying them.
Choosing which distributor supplies a brand
When two or more distributors carry the same brand, you can decide which of them actually feeds it — without giving up the brand itself.
On any brand backed by more than one source, the Sources cell is a button. Click it to open Sources for <brand>:
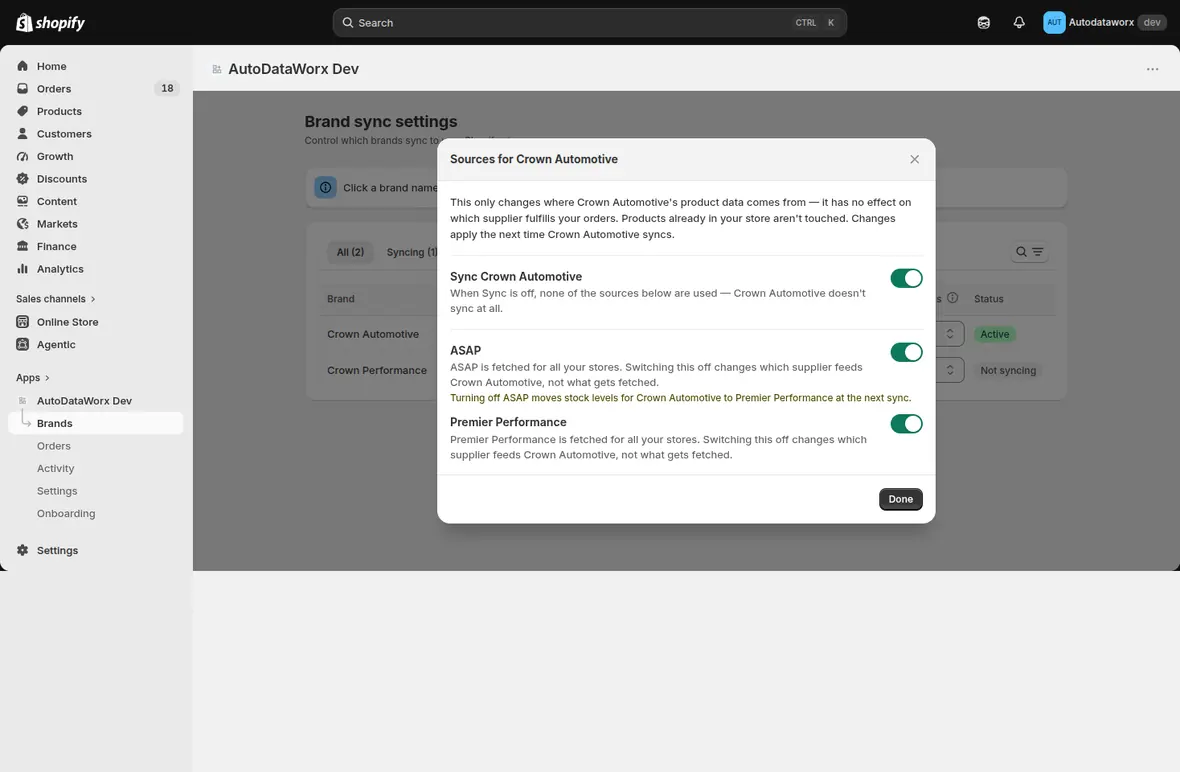
- Sync <brand> is the master. It's the same switch as the row's own Sync control — one setting shown in two places, not two settings. Turn it off and none of the sources below are used.
- Below it, one switch per distributor that carries the brand. Switch a distributor off and it stops supplying this brand's product data.
Where switching a source off would hand a job to a different distributor, the modal says so before you commit — for example "Turning off ASAP moves stock levels for Crown Automotive to Premier Performance at the next sync." That line tells you who picks up the slack, which is usually the thing you actually want to know before flipping a switch.
Three things this does not do, all of them worth knowing before you touch it:
- It doesn't change who fulfills your orders. This is a catalog-data decision only. Order routing is separate — see Fulfillment under Per-brand settings below.
- It doesn't touch products you already have. Nothing is deleted, archived or rewritten when you switch a source off.
- It doesn't take effect immediately. Changes apply the next time that brand syncs.
If one of your connectors is billed per request, its row carries a Metered badge and tells you how many parts it holds for this brand. That's the one place switching a source off saves you money rather than just changing where data comes from. The others are fetched for all stores regardless, so switching them off changes which supplier feeds this brand, not what gets fetched.
Use this when a brand is already well covered by one distributor and you'd rather a second one didn't compete for it — or when a metered connector is spending requests on a brand you're happy to source elsewhere.
Per-brand settings
Click any brand name to open its detail page.
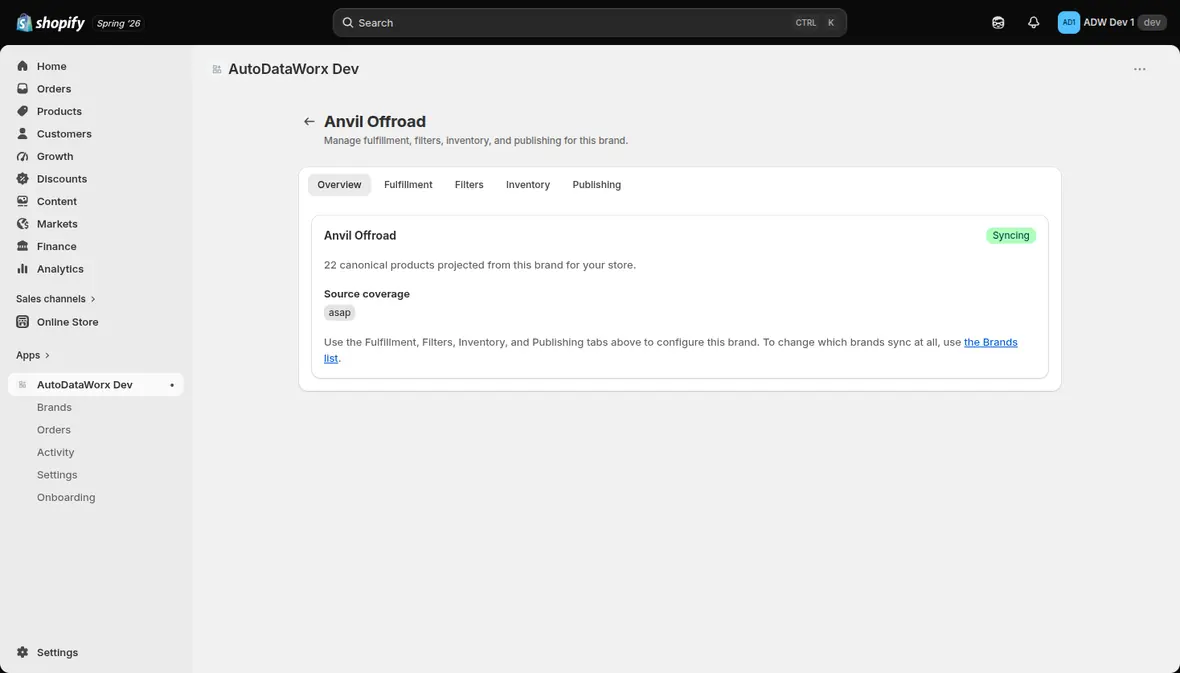
The Overview tab shows how many canonical products the brand contributes and which sources cover it. Five more tabs configure the brand on its own, overriding your store-wide defaults for this brand only.
Fulfillment
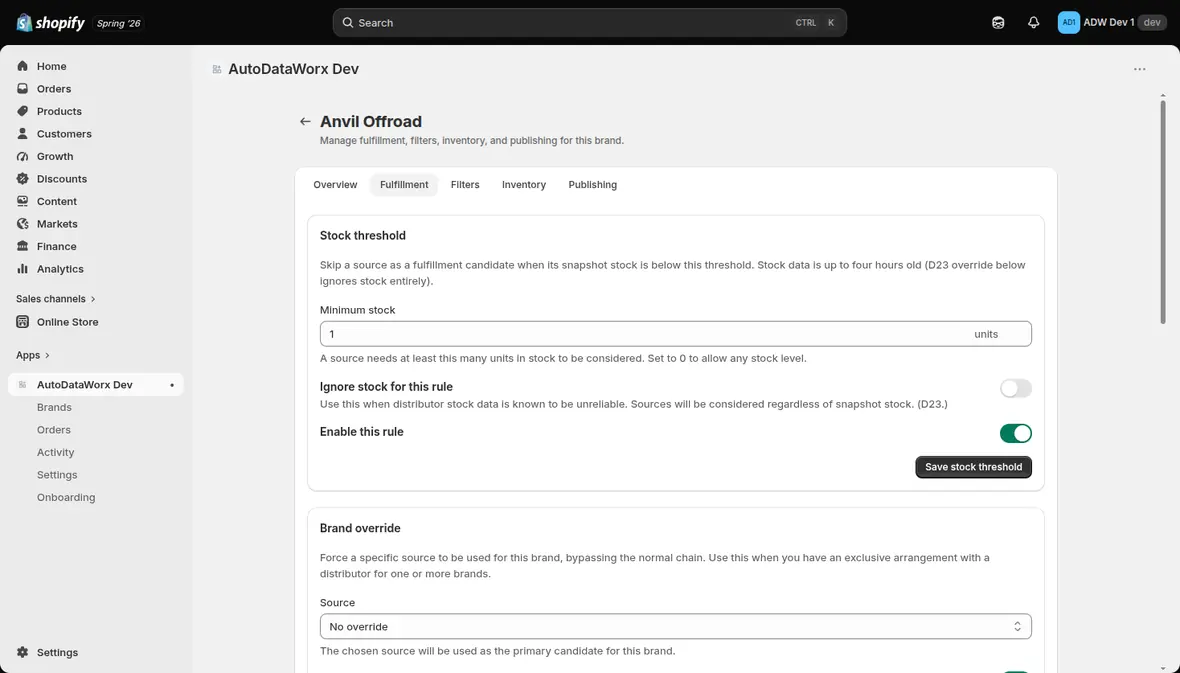
Controls which distributor fills orders for this brand:
- Stock threshold — skip a source as a fulfillment candidate when its stock falls below a minimum. Bear in mind stock data can be up to four hours old. Ignore stock for this rule considers sources regardless of stock, which is useful when a distributor's stock data isn't trustworthy.
- Brand override — force a specific source for this brand and bypass the normal chain. Use it when you've got an exclusive arrangement with a distributor.
- Source exclusion — never consider a given source for fulfillment, while still letting its catalog data sync.
- Cost — once every elimination rule has run, whatever sources survive get sorted by wholesale cost, lowest first. Always on, nothing to configure.
Filters
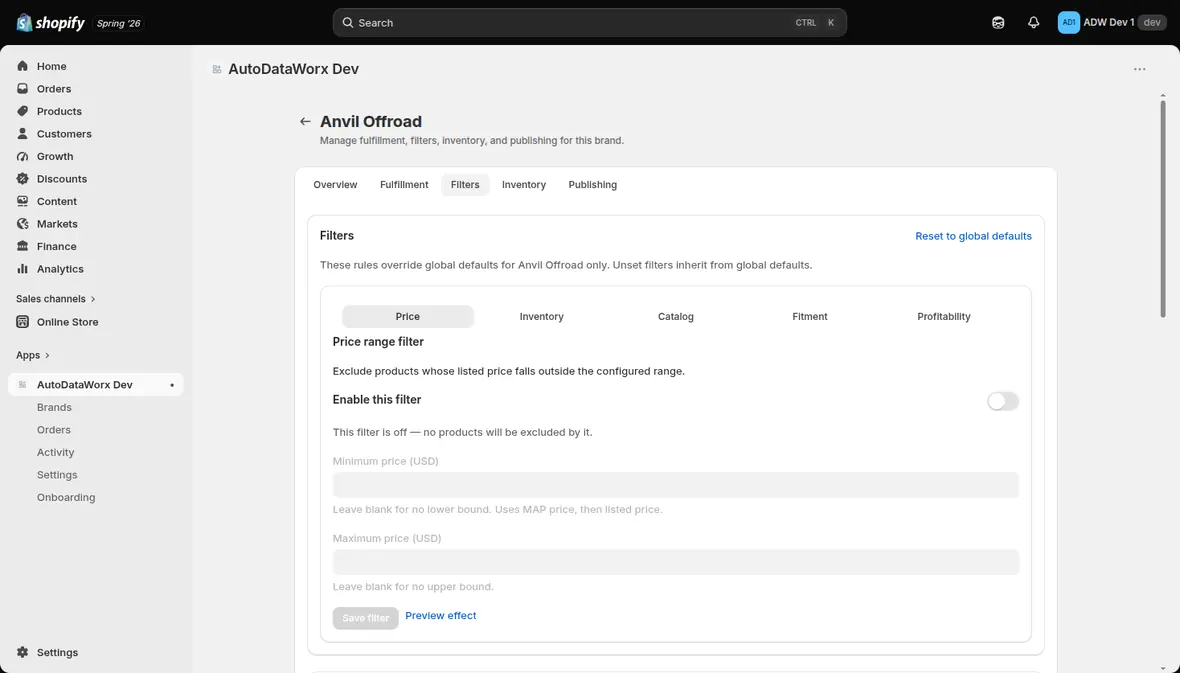
The same five filter tabs as the global settings, scoped to this brand. Anything you leave unset inherits the global default, and Reset to global defaults clears your overrides.
Apply — re-sync <brand> re-evaluates every product in the brand against the current filters. Products that no longer pass get archived. Save your changes first, then apply.
Below the filters, Browse products lists the brand's canonical products with SKU, title and source, searchable by SKU or title. Click any row to edit that product's fitment.
Inventory
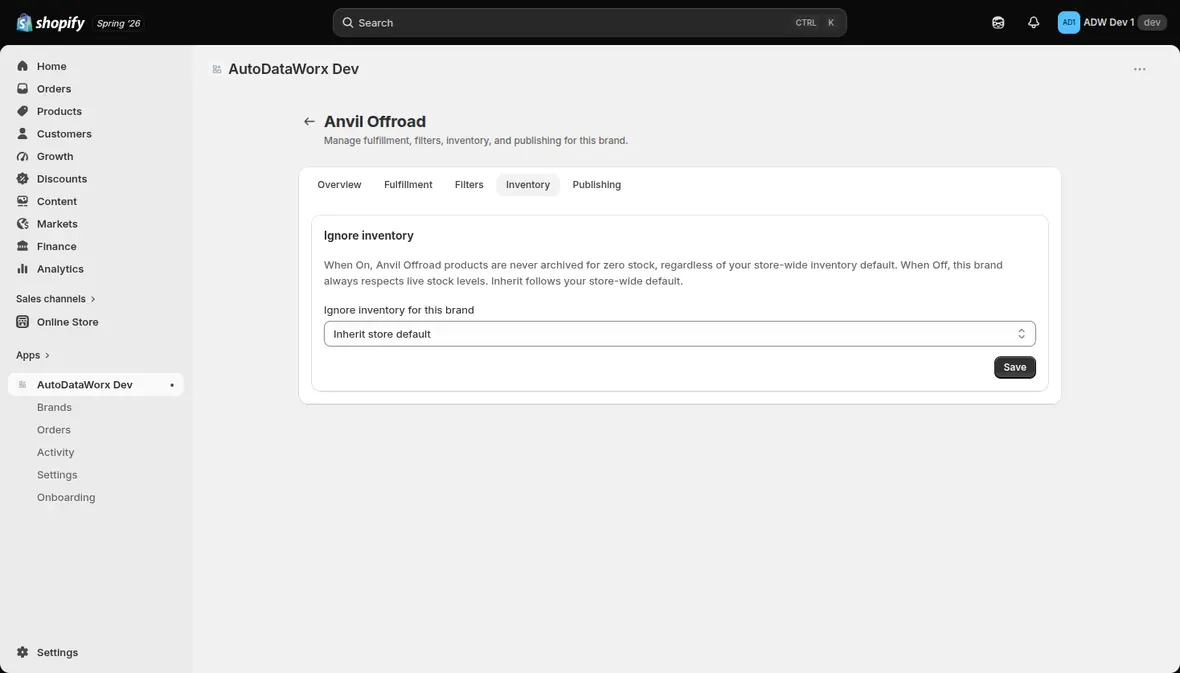
Ignore inventory for this brand — when On, AutoDataWorx stops tracking stock for this brand entirely: quantities are never pushed, and its products are never archived for zero stock, whatever your store-wide default says. Inherit follows the store default.
Sell when out of stock for this brand — what Shopify does when this brand's stock reaches zero. Sell when out of stock suits drop-shipped brands your distributor can still fill; Stop selling at zero suits brands you stock yourself and don't want to oversell. Inherit follows the store default.
This is a different question from the setting above it, and the two combine:
| Ignore inventory | Sell when out of stock | What happens |
|---|---|---|
| On | (no effect) | Stock isn't tracked, so the product can always be sold |
| Off | Sell when out of stock | Stock is tracked, and it keeps selling past zero |
| Off | Stop selling at zero | Stock is tracked, and Shopify stops selling at zero |
Like the store-wide version, it applies to this brand's products as they are created — changing it doesn't rewrite products already in your store, and any change you've made to an individual product in the Shopify admin is left alone.
Apply to existing products — the button below those settings is the only way to change products that are already in your store. Use it when you've changed Sell when out of stock and want the brand's existing products brought in line.
Two things to know before you use it:
- It overwrites the Continue selling when out of stock setting on every one of that brand's products, including any you changed by hand in the Shopify admin. There's no undo — you'd have to change those products back yourself.
- It runs in the background and can take a few minutes. You can leave the page; the tab shows progress and the result when you come back.
Only one of these can run at a time across your whole store, so if you start one for another brand you'll be asked to wait until it finishes.
Re-sync now won't do this. Re-syncing re-runs the whole catalog but leaves the out-of-stock setting on existing products untouched, so it would take a long time and change nothing. Use this button instead.
Publishing
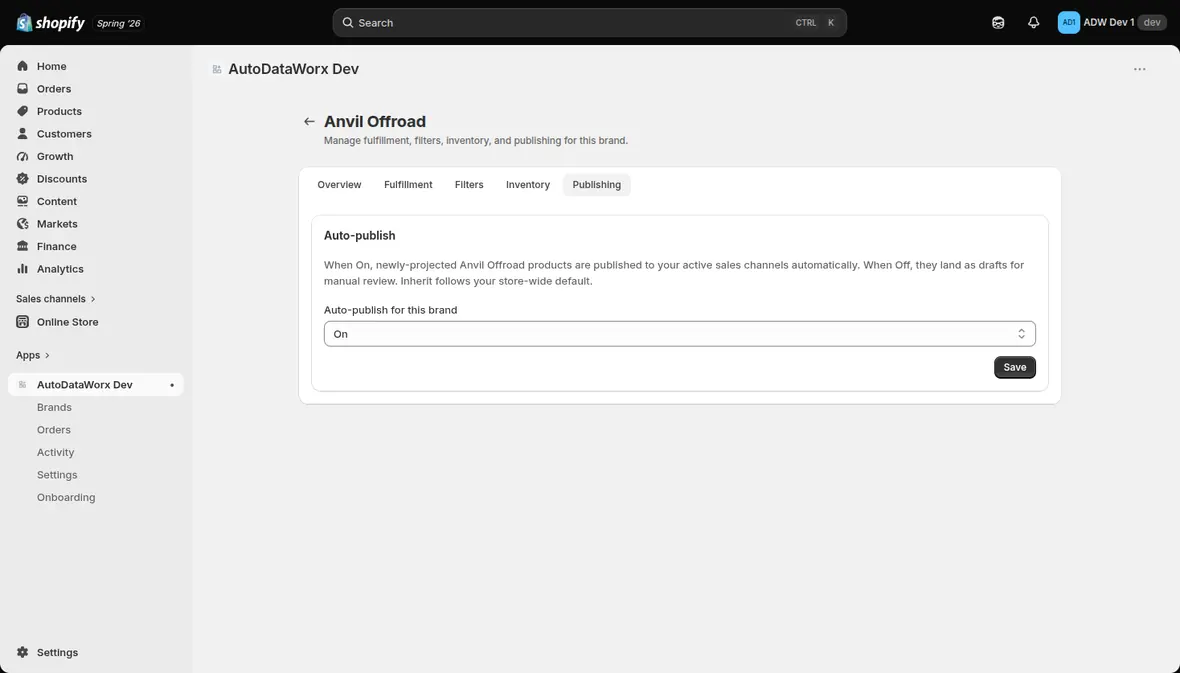
Auto-publish for this brand — when On, newly projected products for this brand publish to your active sales channels automatically. When Off they land as drafts. Inherit follows the store default.
Product status for this brand — the Shopify status products are created with: Inherit / Active / Draft. Status is checked before Auto-publish and wins, so a Draft product never publishes to any channel no matter what Auto-publish says. Set both to On/Active if you want products live. See Chapter 4 for the full resolution table.
Variant grouping sits at the bottom of this tab. It's covered further down, on its own, because it's the only control here that can rewrite products you already have.
Pricing
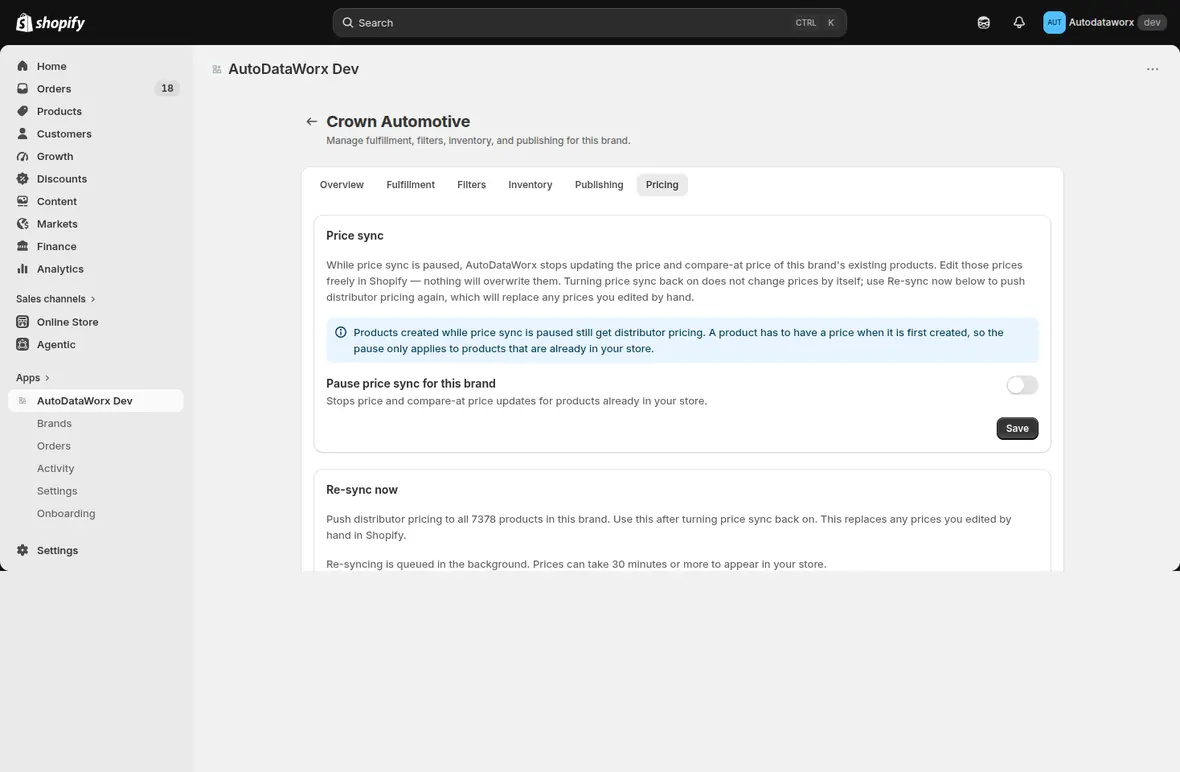
Pause price sync for this brand — when On, AutoDataWorx stops updating the price and compare-at price of this brand's products. Edit those prices in Shopify and nothing will overwrite them.
This is the control to reach for when you want to set your own prices on a brand by hand, or hold a promotional price through a sync.
Four points that decide whether this behaves the way you expect:
- It applies to products already in your store. A product still has to have a price the moment it's created, so products that appear while the pause is on are created with distributor pricing as normal. The pause protects prices from that point forward.
- Both prices move together. Price and compare-at price are paused as a pair, so you can't end up with a stale compare-at advertising a discount against a price you set yourself.
- Everything else keeps syncing. Titles, images, inventory, fitment and the rest are unaffected — this pauses pricing only.
- Turning it back on doesn't re-price anything by itself. Resuming just removes the hold. To push distributor pricing again, use Re-sync now on the same tab — and note that this replaces any prices you edited by hand.
Pausing is per brand and per store. It has no effect on which distributor supplies the brand or fulfills its orders.
Variant grouping, per brand
Your store-wide Variant strategy (Settings → Variant strategy) decides whether related part numbers become one Shopify product with a size/finish/offset picker, or a separate product each. Any brand can now depart from that:
| Option | What you get |
|---|---|
| Inherit store default | Follows Settings → Variant strategy |
| Group variants — one product with options | Related part numbers share one product with a variant picker |
| Keep separate — one product per part number | Every part number is its own product |
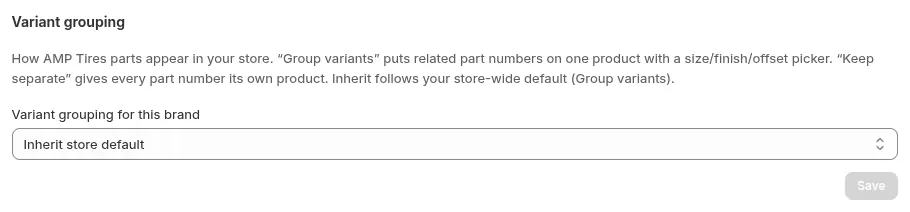
Use it when one brand's catalog behaves differently from the rest — a wheel brand where grouping by size and finish is exactly right, alongside an accessories brand where every part is genuinely a distinct product.
Brands where the option isn't offered

If the tab says "<brand> products are always listed individually. This brand's distributor doesn't supply the information needed to group related part numbers onto one product", that's the whole story. Grouping needs the distributor to tell us which part numbers belong together, and not every feed does. The control is explained rather than greyed out, because a disabled dropdown with no reason reads as a bug.
Changing it rebuilds the brand
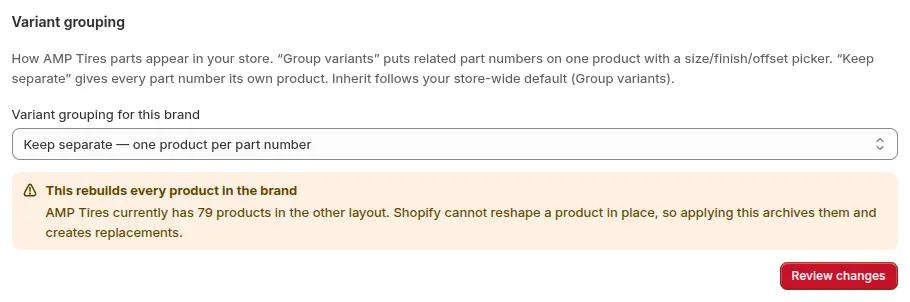
This is the part to read before you touch it. Shopify cannot reshape an existing product's option structure in place. Switching a brand that already has products between the two layouts means the app archives every one of them and creates replacements.
Change the dropdown on a brand that has products and the warning appears immediately, naming the count — you see it before you commit to anything, and the button turns red and reads Review changes rather than Save.
The app makes you go through a confirmation that spells this out and asks you to type the brand name, because an OK button is too cheap for an operation that archives a whole brand. The replacements do not carry over:
- Product URLs — existing links to these products stop working
- Any Active/Draft status you set by hand on those products
- Membership in manual collections
- Reviews, and data other apps store against the product
- Items already in a customer's cart
- Listings on Google, Meta and other channels — they relist from scratch
The old products are archived, not deleted, so they can be restored if something goes wrong. Past orders are unaffected.
Once started, the rebuild runs in the background and you can leave the page. Products are archived and recreated one at a time, so your storefront is never missing the whole brand at once. The tab shows live progress ("Rebuilding Fox: 340 of 612 products archived (56%)") — reload to refresh it — and reports any products it couldn't archive, which are left exactly as they were. Only one rebuild per brand runs at a time.
Changing the setting on a brand with no products yet costs nothing. There's nothing to restructure, so it saves immediately with no confirmation. Set the grouping you want before you enable a brand and you skip all of this.
3.3 Per-product fitment
From a brand's Filters tab, click a product row to open its fitment editor.
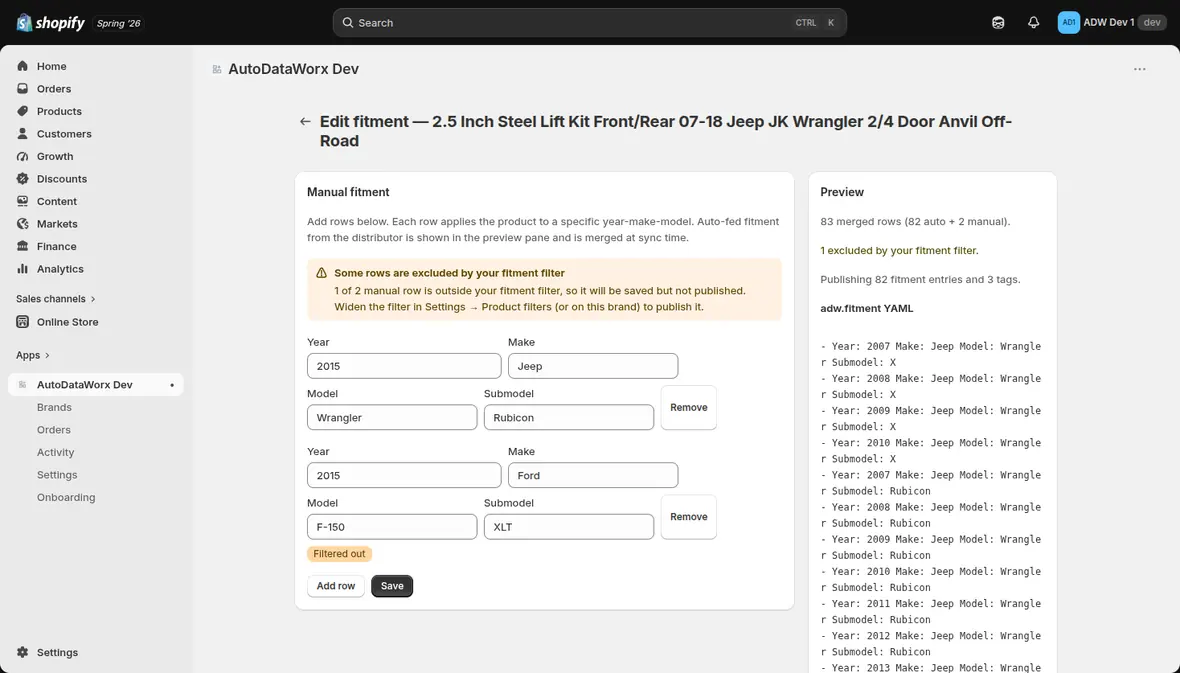
Manual fitment lets you add year-make-model rows by hand. Fitment that came from the distributor shows up in the preview pane and gets merged with your manual rows at sync time, so adding manual fitment never throws away the distributor's data.
The Preview pane reproduces exactly what the sync will publish, in order: your merged rows, minus anything your fitment filter excludes, then the entry and tag caps from Settings → Product filters. It shows:
- how many rows will result (
N merged rows (N auto + N manual)) - how many rows each step removed — filtered out, over the entry cap, over the tag cap — and what will actually publish after all three
- the
adw.fitmentYAML that will be written to the product metafield - the derived tags applied to the Shopify product (for example
universal-fit)
Rows outside your fitment filter are never silently dropped. Each one is flagged with a Filtered out badge, and a banner tells you how many there are and where to widen the filter if you want them published.
Filtered rows are still saved — they just don't publish. Widen the fitment filter (globally, or on this brand) and they start publishing with no re-entry needed. Universal-fit products skip the filter entirely.
Reach for this when a distributor's fitment data is missing or wrong on a specific part, or when you want to see why a vehicle you expected isn't appearing on the storefront.
3.4 Activity
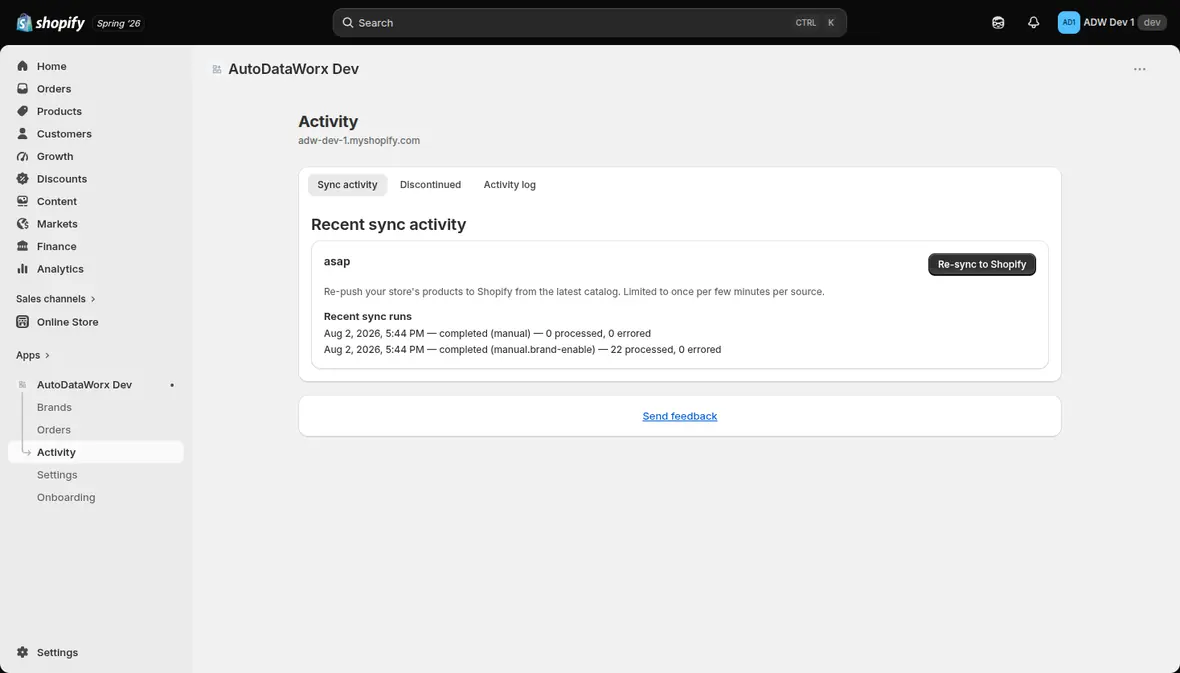
Three views: Sync activity, Discontinued, and Activity log.
Recent sync runs lists each run with its timestamp, outcome, trigger and counts. For example:
Aug 2, 2026, 5:44 PM — completed (manual.brand-enable) — 22 processed, 0 errored
The trigger tells you why a run happened: a scheduled sync, a brand being
enabled (manual.brand-enable), or a manual re-sync.
Re-sync to Shopify pushes your products to Shopify again from the latest catalog. It's rate-limited to once every few minutes per source.
Re-sync re-projects existing catalog data. It doesn't re-fetch from the distributor. Fresh distributor data arrives on your sync cadence, or when you enable a brand that hasn't been imported before.
3.5 Orders
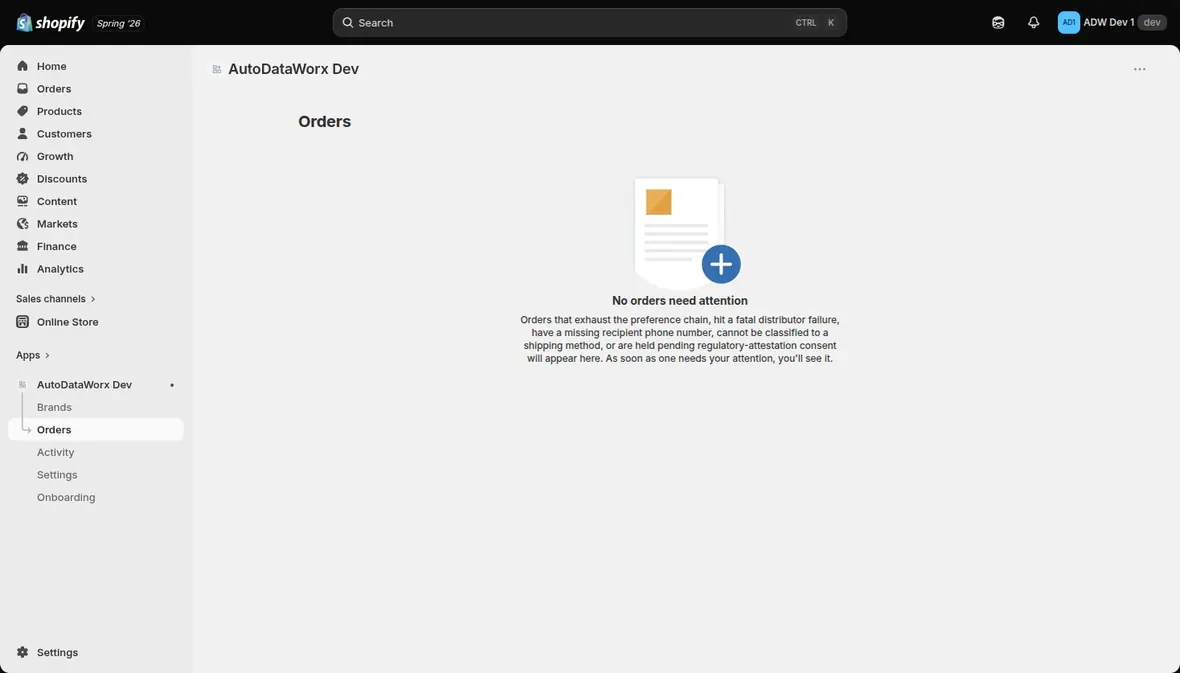
The Orders screen lists only orders that hit a problem during intake. An empty screen is the normal, healthy state.
It is not a fulfillment queue. The app does not submit orders to your distributor on current plans — you fulfill in Shopify, and the app reconciles afterwards. An empty Orders screen therefore doesn't mean orders were sent anywhere. See Chapter 4.
An order shows up here when it:
- exhausts the preference chain (no source could fill it)
- hits a fatal distributor failure
- has a missing recipient phone number
- can't be classified to a shipping method
- is held pending regulatory-attestation consent
For each one you can approve it, re-route it to a different source, adjust quantities, or verify it. Each carries a badge naming the actual blocker — No recipient phone, Unrecognized shipping, Payment not captured, No active plan, Consent not recorded — so you can see what needs fixing without opening it. Re-routing an order held at intake does nothing until the blocker itself is cleared.
If you'd rather review these before they're released, turn on Manual order processing in Settings → Orders. See Chapter 4.
Chapter 04
Settings reference
Settings is organized into ten sections in a left-hand sidebar, grouped under Sources and Products.
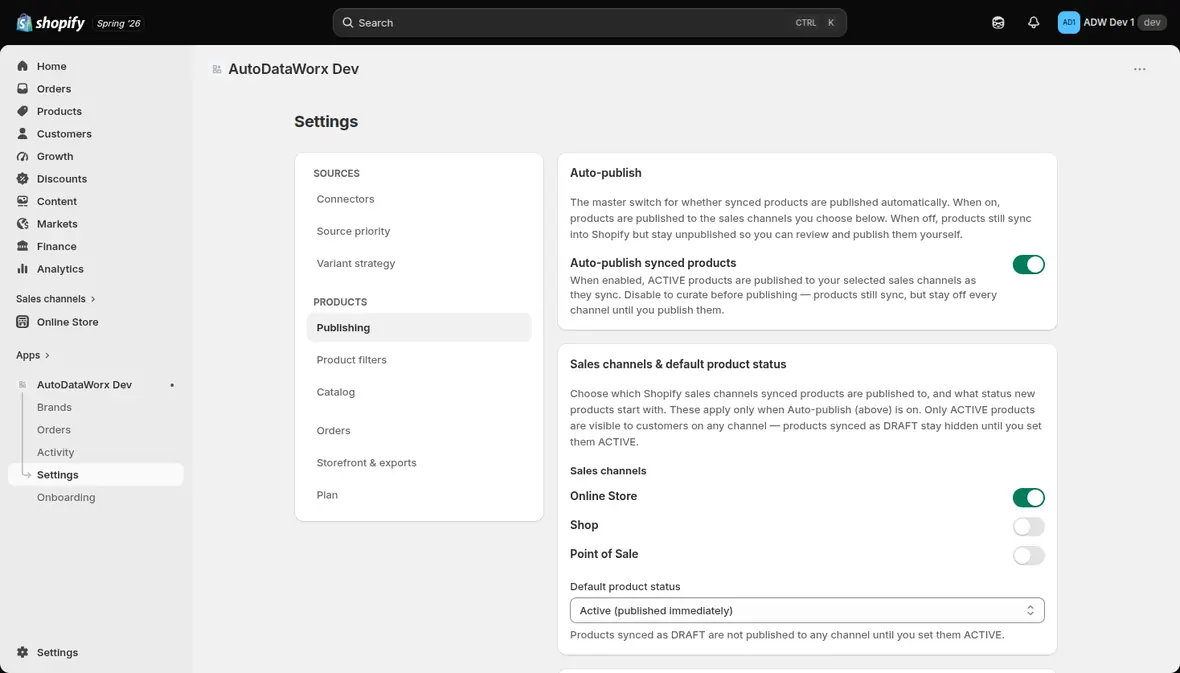
| Group | Section |
|---|---|
| Sources | Connectors, Source priority, Variant strategy |
| Products | Publishing, Product filters, Catalog, Collections |
| Ungrouped | Orders, Storefront & exports, Plan |
4.1 Connectors
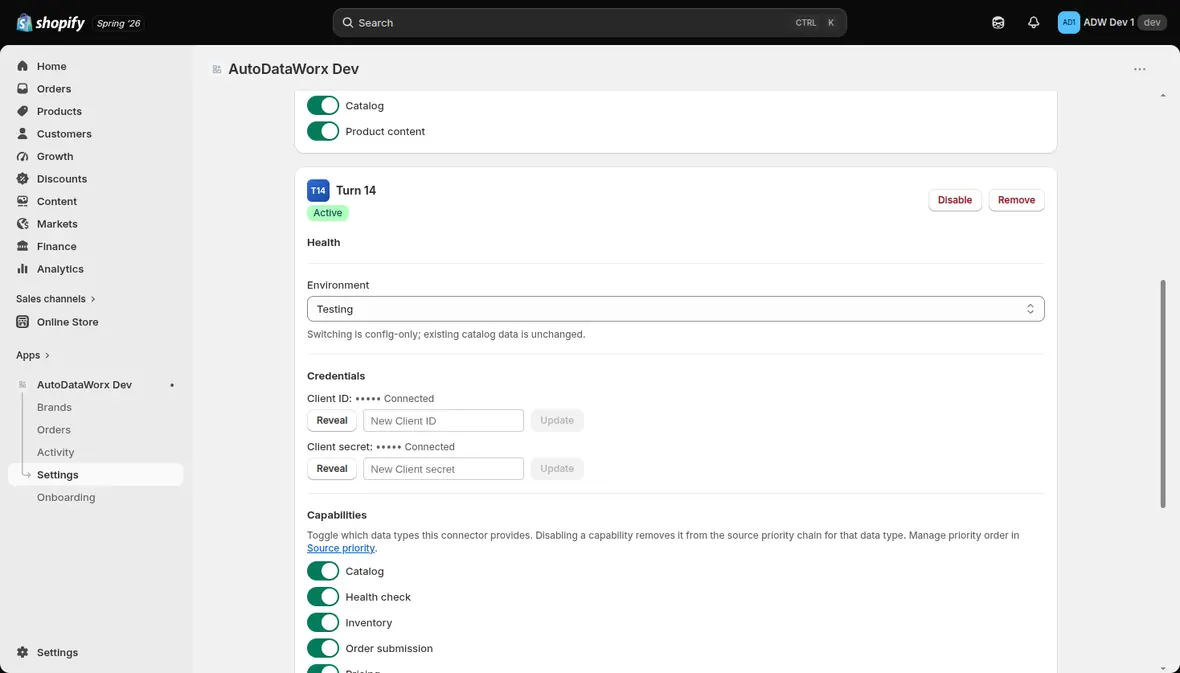
Manage your distributor connections here. Each connected source shows a health
status and its stored credentials as •••••, with Reveal and Update
buttons.
Per connector you can:
- Disable — stop using the connector without deleting it.
- Remove — disconnect entirely.
- Refresh entitlements — re-read your brand access list from the distributor. Run this whenever your distributor grants you new brands.
- Capabilities — toggle which data types this connector provides. Disabling a capability pulls the source out of the priority chain for that data type.
Capabilities vary by distributor. ASAP provides Catalog and Product content. Turn 14 provides Catalog, Health check, Inventory, Order submission, Pricing and Product content. Wheel Pros, MotorState and Premier Performance each provide Catalog, Product content, Pricing and Inventory.
Turn 14 also has an Environment switch (Testing / Production). Switching is config-only, and your existing catalog data is left alone.
New brands, per connector
Each connected source also carries a New brands setting, which decides what happens when that distributor starts carrying a brand you already sell:
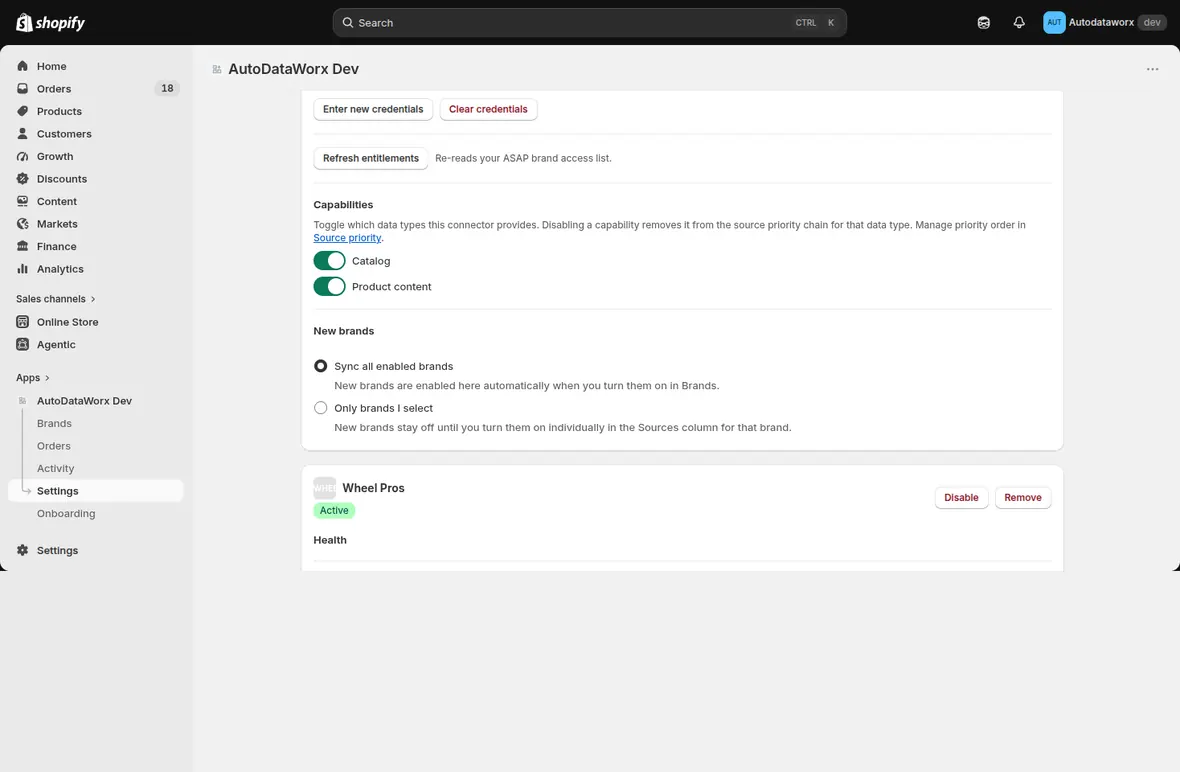
| Choice | What happens |
|---|---|
| Sync all enabled brands | New brands are enabled here automatically when you turn them on in Brands |
| Only brands I select | New brands stay off for this connector until you turn them on individually in its Sources cell |
Only brands I select makes a connector opt-in: it supplies a brand only when you've explicitly said so, brand by brand, using the Sources button described in Chapter 3. That's the setting to pick for a connector billed per request, where you want to spend its requests deliberately rather than have every new brand pull from it.
This is not the same control as Auto-enable new brands in Source priority, and the two are easy to confuse. Auto-enable new brands decides whether a brand joins your catalog at all. New brands here decides, for a brand already in your catalog, whether this particular connector feeds it. One is about your catalog; the other is about which supplier fills it.
Connectors you haven't set up yet show their credential fields inline, so you can add a second or third distributor whenever you want.
4.2 Source priority
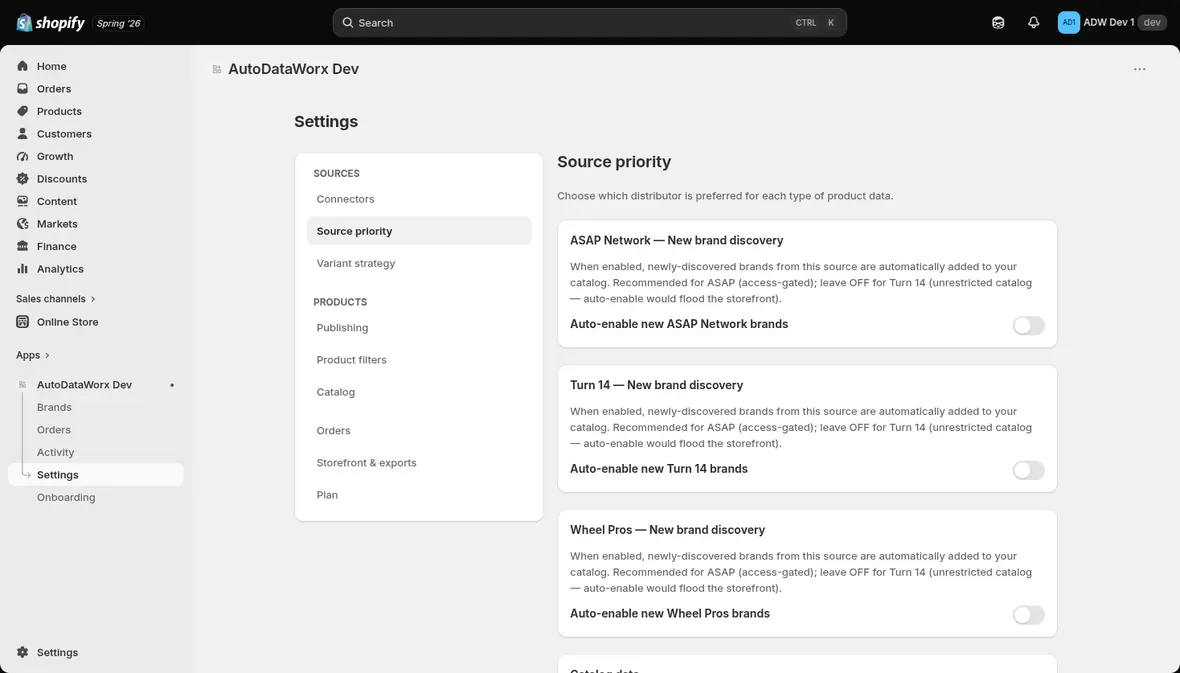
When more than one distributor carries the same part, this decides who wins, and it decides separately for each type of data. Sources are tried in order: rank 1 preferred, rank 2 the fallback. Reorder with Up / Down, then Save.
Priority is set independently for Catalog data, Pricing, Inventory and other data types, so you can take content from one distributor and pricing from another.
New brand discovery
Each source has an Auto-enable new brands switch. Turn it on and newly discovered brands from that source join your catalog automatically.
We'd recommend on for ASAP, since it's access-gated and you only ever see brands you're entitled to, and off for Turn 14, whose catalog is unrestricted — auto-enabling there would flood your storefront.
This switch governs whether a newly discovered brand joins your catalog at all. Once a brand is in your catalog, which connectors supply it is a separate decision — see New brands, per connector above and the per-brand Sources button in Chapter 3.
4.3 Variant strategy
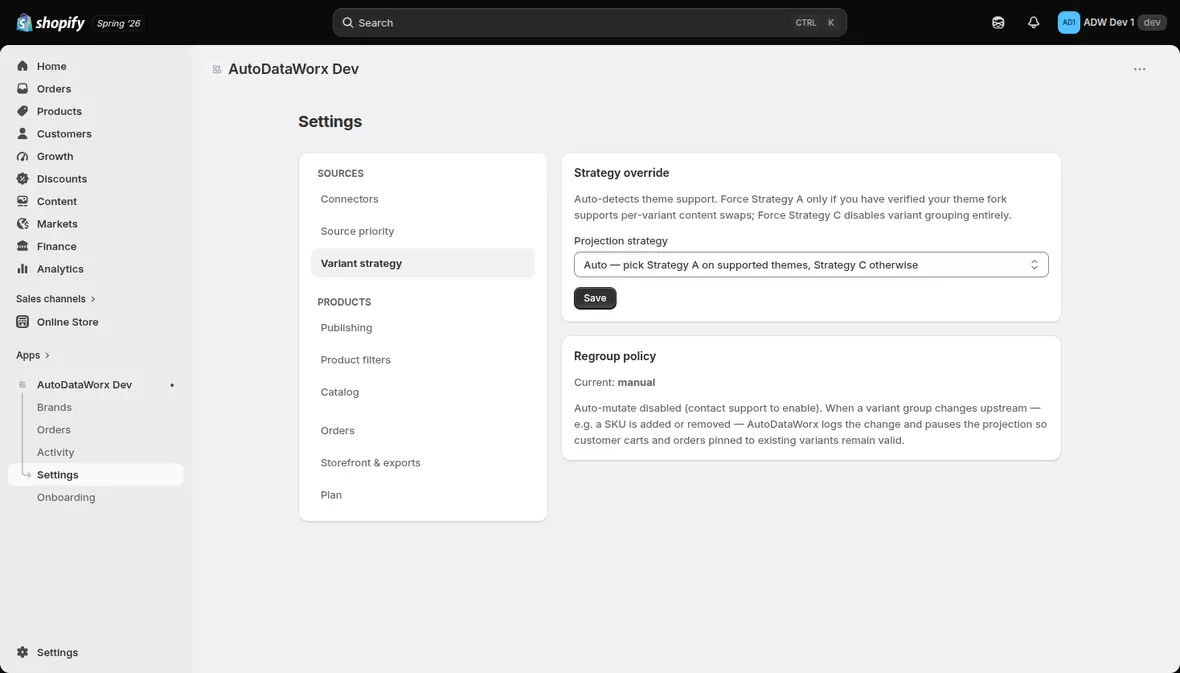
Controls how products with multiple variants get built in Shopify.
Projection strategy:
- Auto (default) — Strategy A on supported themes, Strategy C otherwise.
- Force Strategy A — multi-variant projection. Only force this if you've confirmed your theme supports per-variant content swaps.
- Force Strategy C — one product per SKU. The safe fallback.
Regroup policy — currently manual. When a variant group changes upstream (a SKU added or removed), the app logs the change and pauses that projection so customer carts and orders pinned to existing variants stay valid.
Per-brand variant grouping
This screen sets the store-wide default. Any brand can depart from it on its own Publishing tab (Brands → [brand name] → Publishing → Variant grouping), choosing Inherit, Group variants, or Keep separate — worded in terms of what you get rather than Strategy A/C.
Two things make this different from every other per-brand override:
- Some brands can't offer it. Grouping needs the distributor to say which part numbers belong together. When the feed doesn't, the tab explains that instead of showing the dropdown.
- Changing it on a brand that already has products rebuilds them all. Shopify can't reshape a product's option structure in place, so the app archives every product in the brand and creates replacements. Product URLs, manual collection membership, reviews and channel listings do not survive. There's a type-the-brand-name confirmation, and it's worth reading rather than clicking through. Full detail in Chapter 3.
Set the grouping you want before enabling a brand and none of that applies — with no products yet, the change saves instantly.
4.4 Publishing
The same controls as wizard Step 3: Auto-publish, Sales channels, and Default product status. See Chapter 2, Step 3.
There's one addition here:
Apply — re-publish all products re-publishes your existing catalog to the updated channel selection and applies the default status across all brands. It runs in the background and can take several minutes. Change your settings first, then apply.
Discontinued products — what happens to a product when its supplier discontinues it: Draft (the default) or Archived. Both take it off sale. The setting applies to products discontinued from then on; to move the ones already discontinued, press Apply to N discontinued products underneath. Products you've put back on sale yourself are left alone.
A product whose other variants are still available is never taken off sale because one variant was discontinued.
Per-brand Product status
Both publishing axes can be set per brand, on that brand's page (Brands → [brand name]): Auto-publish and Product status, each offering Inherit / Active / Draft (or Inherit / On / Off for Auto-publish). Inherit follows the store-wide default above.
Status is checked before Auto-publish, and it wins. A product created as Draft is never published to any sales channel, whatever Auto-publish says. So these two combine into one trap worth knowing:
| Auto-publish resolves to | Product status resolves to | Result |
|---|---|---|
| On | Active | Published to your selected channels |
| On | Draft | Nothing publishes — Auto-publish cannot fire |
| Off | Active | Created Active, but on no channel until you publish |
| Off | Draft | Held for review |
The second row is the common misconfiguration: turning Auto-publish on for a brand does nothing at all if your store-wide Default product status is Draft, because status is resolved first. The brand page detects exactly this combination and shows a warning — "Auto-publish will have no effect on this brand" — rather than letting you wait for products that will never appear.
Changing a brand's Product status affects new products immediately. Products already synced keep their current status until you run Settings → Publishing → Apply — re-publish all products.
4.5 Product filters
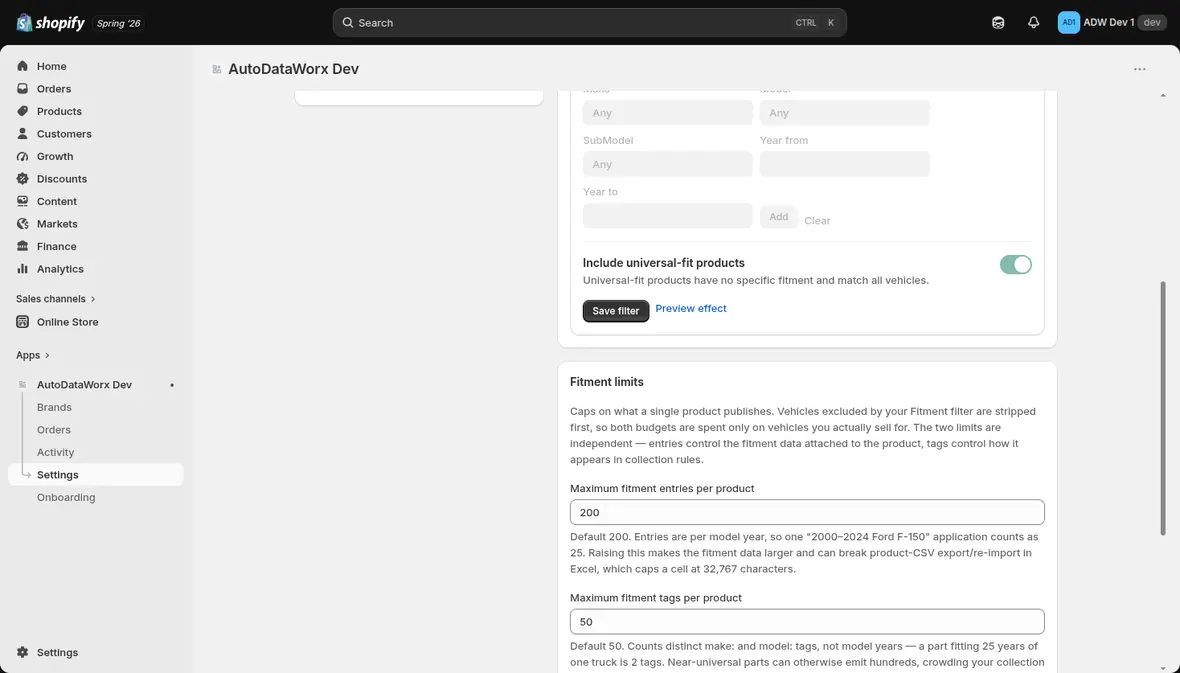
The store-wide defaults for all five filter families: Price, Inventory, Catalog, Fitment, Profitability. They're documented in detail in Chapter 2, Step 4.
Any brand can override these from its own Filters tab — read How brand overrides resolve below before you set your first one.
Apply — re-sync all brands re-evaluates your entire catalog against the current filters. Products that no longer pass get archived. Save first, then apply; it can take several minutes.
How brand overrides resolve
Each brand has its own Filters tab (Brands → [brand name] → Filters) carrying the same five filter families as this screen. The rule that decides which one applies is simple, and it is not a merge:
For each filter family, a brand either has its own rule or it doesn't. If it does, that rule is used and the store-wide default is ignored completely. If it doesn't, the store-wide default is used.
There is no field-level inheritance. A brand override is a complete replacement of the store-wide filter for that family — including every field you didn't consciously change. Setting one thing on a brand's Fitment tab does not leave the rest of that brand's Fitment settings following your global filter; it detaches the whole family.
Each filter family resolves independently, so a brand can override Fitment while still following your store-wide Price and Inventory filters.
The three states of a brand filter
The Filters tab distinguishes these, and the on-screen copy tells you which one you're looking at:
| State | What you see | What the app does |
|---|---|---|
| No override saved | "No override set. Global default applies." — and the toggle sits off even so | Uses the store-wide filter |
| Override saved, filter on | An Active badge | Uses the brand's rule; store-wide filter ignored |
| Override saved, filter off | "This filter is off for this brand — the global default does not apply to it." | No filtering of this family for this brand at all |
The third row is the one worth pausing on. Saving a brand override with the filter switched off doesn't restore the store-wide default — it turns that filter family off for that brand, so a global filter that was excluding products stops excluding them there. That's a deliberate, useful state (it's how you exempt one brand from a store-wide rule), but it's reachable from a screen whose toggle already looked off, which is why the app spells out which state you're in. When the toggle is off and nothing is saved yet, the copy reads "The global filter still applies to this brand. Click 'Save filter' to turn it off for this brand only."
Prefilling, and drift
Because a brand rule replaces the global one outright, saving a brand override from an empty form would silently discard your store-wide vehicle restriction. To prevent that, opening a brand's Fitment tab for the first time prefills the editor from your global filter and says so:
Prefilled from your global fitment filter (15 vehicles). Saving applies this list to this brand only — later changes to the global list will not follow.
That prefill is a snapshot, not a live link. Once saved, the brand keeps its own copy of the vehicle list, and later edits to your store-wide list do not reach it. The tab shows a running comparison — "This brand: 12 · Global: 15" — which turns amber once the two diverge, alongside a Copy global list again button that re-syncs the brand's list from global.
Practical rule: if you change your store-wide vehicle list, check any brand that has its own Fitment override. Those brands keep the old list until you copy it across.
After changing a brand's filters, use Apply — re-sync <brand> on that tab so the change reaches products already synced, not just future ones.
Fitment limits
Below the filter tabs, Fitment limits caps what a single product publishes. It sits next to the Fitment filter because the two compose: the filter decides which vehicles publish, these decide how many. Vehicles your filter excludes are stripped first, so both budgets are spent only on vehicles you actually sell for.
The two limits are independent and govern different things.
Maximum fitment entries per product — default 200, up to 800. Entries are counted per model year, so one "2000–2024 Ford F-150" application is 25 entries, not one. This controls the size of the fitment data attached to the product. Raising it makes that data larger and can break product-CSV export and re-import in Excel, which caps a single cell at 32,767 characters.
Maximum fitment tags per product — default 50, up to 250. This counts
distinct make: and model: tags rather than model years, so a part fitting 25
years of one truck is 2 tags. Near-universal parts can otherwise emit hundreds,
which crowds your collection rules and runs into Shopify's hard 250-tag ceiling.
Row depth and tag breadth are only loosely related, which is why these are two knobs rather than one. A gauge fitting 12,000 rows might be 400-plus tags, while a legitimate air spring fitting 2,300 rows is only ~53 real make/model combinations and deserves to keep them.
Products that hit either cap still publish — they publish trimmed. The per-product fitment editor shows exactly what each limit removed (Chapter 3).
Emit make-model fitment tags
Also below the filter tabs, and off by default. Normally a product fitting a
2015 Ford F-150 gets a make:ford tag and a model:f-150 tag separately, which
makes a collection rule for "anything that fits an F-150" awkward — the two
tags match independently, so a Ford part that fits some other model still
qualifies.
Turn this on and the app adds a combined tag alongside them, like
make-model:ford-f-150, so one rule targets one specific vehicle exactly.
- It's additive — nothing is removed, and the existing
make:andmodel:tags stay exactly as they are. Enabling it strips nothing. - It applies on each product's next sync, not immediately.
- The combined tags count against the fitment tag limit above. A part fitting many vehicles roughly doubles its tag usage, so if you're near the cap, raise Maximum fitment tags per product at the same time.
This is independent of the Collections opt-in below. You can build your own collection rules on these tags without ever letting the app create a collection, and you can use the app's collections without turning this on.
4.6 Catalog
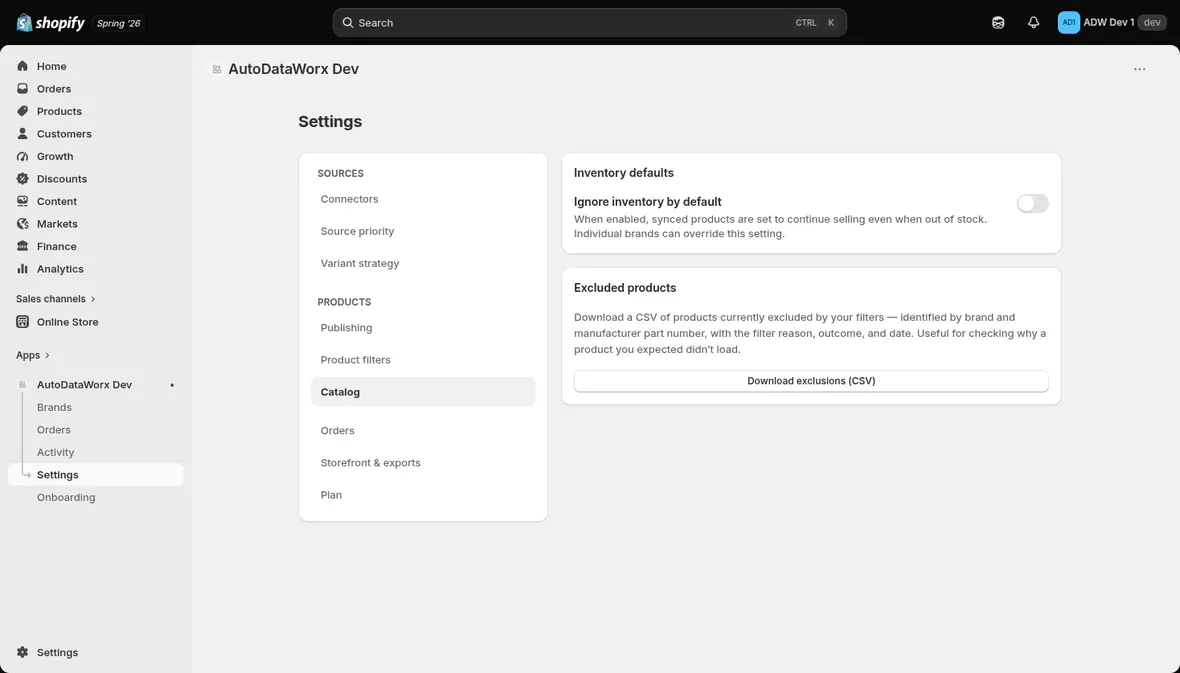
These two settings both mention stock and are easy to mix up, so read them together. The first decides whether AutoDataWorx tracks stock at all; the second decides what Shopify does once tracked stock hits zero.
Ignore inventory by default — when enabled, AutoDataWorx stops tracking stock for synced products entirely: quantities are never pushed to Shopify, and products are never archived for being out of stock. Individual brands can override it on the brand's Inventory tab.
Sell when out of stock — when enabled, newly synced products can still be sold once stock reaches zero. When disabled, Shopify stops selling them at zero — which is what you want for products you physically stock and don't want to oversell. Individual brands can override it, so you can let a drop-shipped brand keep selling while a brand on your own shelf stops at zero.
Two things to know about it:
- It has no effect while Ignore inventory is on for that product's brand — an untracked product can always be sold, so Shopify ignores the setting.
- It applies to products as they are created. Changing it does not rewrite products already in your store, and any change you make to an individual product in the Shopify admin is left alone.
Excluded products — Download exclusions (CSV) gives you every product currently excluded by your filters, identified by brand and manufacturer part number, with the filter reason, outcome and date.
This is the fastest way to answer "why didn't this product load?".
4.7 Collections
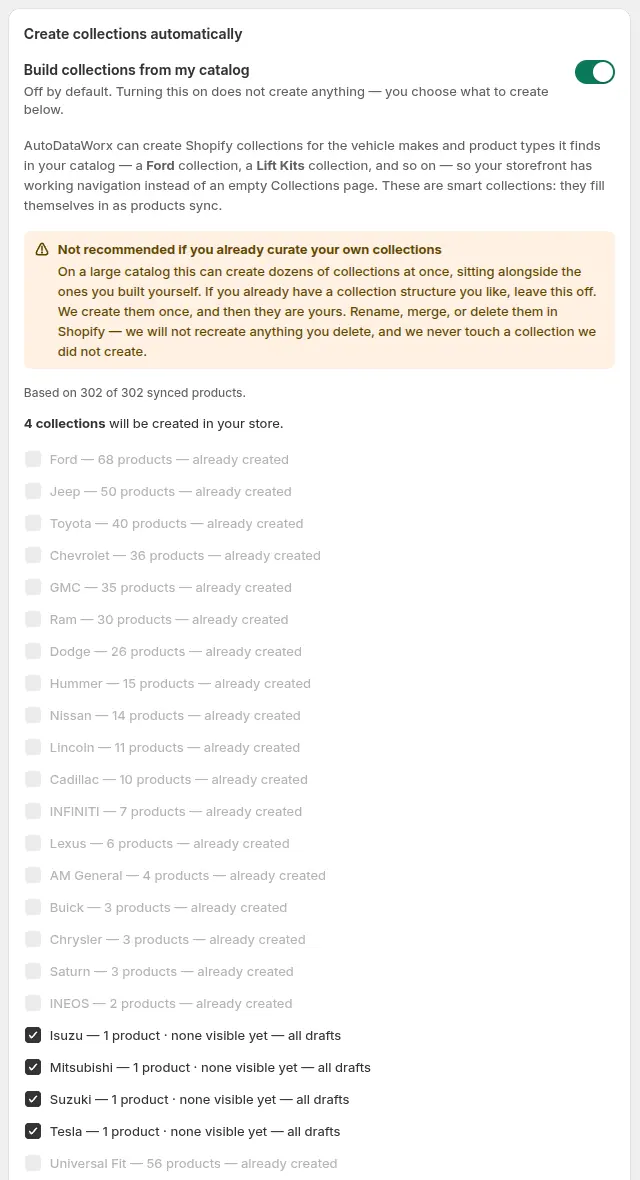
A store with thousands of synced products and an empty Collections page has no navigation. This section builds you one: AutoDataWorx can create Shopify collections for the vehicle makes and product types it finds in your catalog — a Ford collection, a Lift Kits collection, and so on.
They're created as smart collections, so they fill themselves in as products sync. You don't have to come back and re-run anything when new products arrive.
It is a two-step opt-in, and nothing happens by accident
Build collections from my catalog is off by default, and turning it on creates nothing. It records the preference and unlocks the button below. Creating collections is a separate, explicit click where you choose exactly which ones.
Leave it off if you already curate your own collections. On a large catalog this can create dozens at once, sitting alongside the ones you built yourself. If you have a structure you like, this isn't for you.
The preview
Below the switch, the app shows what it would create — and this is a read-only preview, computed only while you're looking at this section.
Each candidate is one line: the collection title, how many products match, and how many of those a shopper can actually see.
| What you see on a line | What it means |
|---|---|
Ford — 412 products |
All 412 are Active, so the collection will look full immediately |
Ford — 412 products · 88 visible |
The other 324 are Drafts; shoppers see 88 until you publish them |
Ford — 412 products · none visible yet — all drafts |
The collection gets created and published, but renders empty to shoppers |
Ford — already created |
We made it before. Locked — we won't make a second one |
Ford — already exists, will be skipped |
You already have a collection with that handle. Locked, and never touched |
That last pair matters. We never touch a collection we didn't create. If you already have a Ford collection, the app leaves it alone rather than creating a duplicate beside it.
The visible count is there because it's the one thing you can't work out for yourself. A Shopify smart collection has no rule for product status, so it cannot exclude Drafts — a collection whose products are all Drafts gets created, gets published, and looks empty on your storefront. Nothing is broken; it fills itself the moment you publish those products.
Above the list, a coverage line reads "Based on 4,102 of 6,730 synced products." A gap there means the rest haven't re-synced since the app started recording this data — the counts grow on their own, so a low number means "not observed yet", never "your catalog is empty".
Choosing and creating
Sensible candidates come pre-ticked: every vehicle make with at least two products, plus the twenty largest product types. Tick and untick freely — you adjust by choosing collections, never by tuning a threshold. The button names the count it will act on ("Create 23 collections").
If you have no sales channels selected, a red banner says so first. Collections created then wouldn't appear on your storefront at all. Fix it in Publishing before creating.
After they're created, they're yours
Rename them, merge them, delete them, reorder them — they're ordinary Shopify collections from that point on. We will not recreate anything you delete.
Two related controls live elsewhere:
- The onboarding opt-in. The same preference appears on wizard Step 3, where it can only record intent — nothing is synced yet (Chapter 2).
- Make-model tags. If you'd rather write your own collection rules, the make-model fitment tag switch is independent of this section entirely.
4.8 Orders
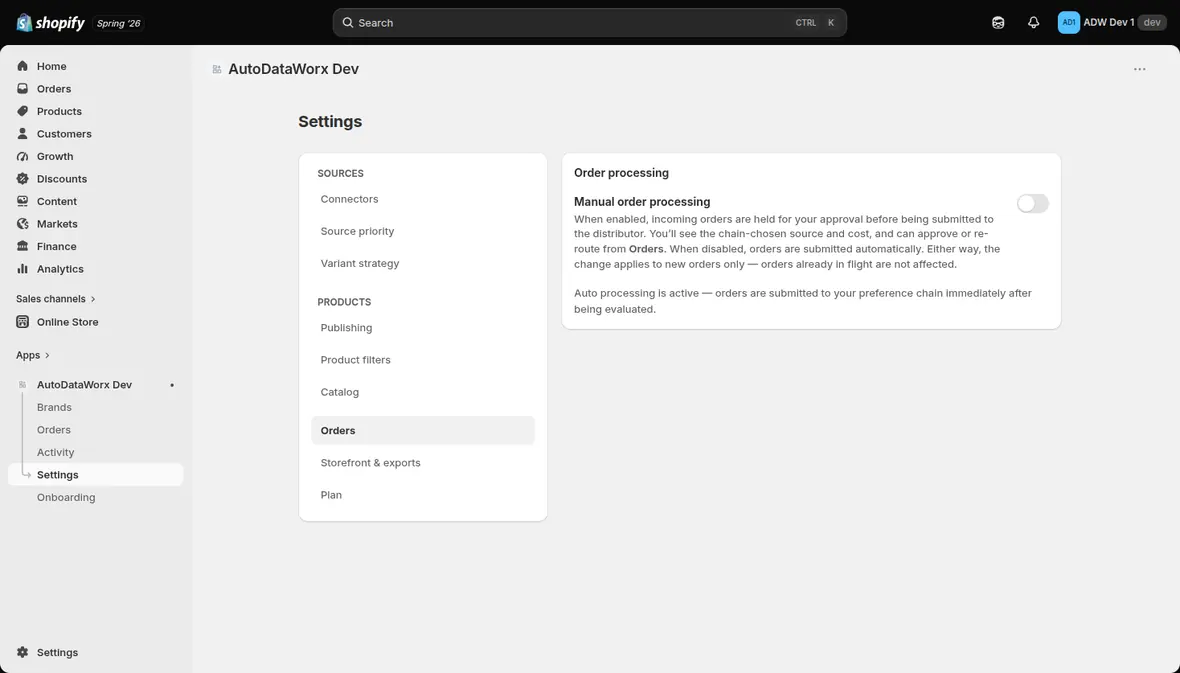
Placing orders with your distributor is not part of your current plan. Read this section before you rely on the app to fulfill anything.
What the app does with an order today. Every paid order is still evaluated: the app works down your preference chain, determines which distributor could fill each line and at what cost, and records that. It then stops there — it does not transmit the order to a distributor, by any route. That applies to automatic submission and to the manual approve and re-route actions alike.
How an order gets fulfilled, then. You fulfill it in Shopify as you normally would, using whatever process you use for the rest of your catalog. The app notices the fulfillment on its next reconciliation pass and clears its own internal hold on that order. There is nothing for you to do inside AutoDataWorx — orders held this way are not listed on the Orders screen, so an empty Orders screen does not mean anything is waiting on you.
Distributor submission requires a plan tier that isn't currently offered. It's coming with the orders rework; until then, treat AutoDataWorx as the system that keeps your catalog, pricing and inventory correct, and Shopify as the place orders get fulfilled.
Manual order processing still governs the approval flow for the orders that do surface on the Orders screen — the ones that hit a problem during intake (no recipient phone, unrecognized shipping, payment not captured, and so on):
- On (default) — those orders wait for your review, and you can adjust quantities or re-route them to a different source before releasing them.
- Off — they're released as soon as they're evaluated.
The banner tells you which mode is active. Either way, the change applies to new orders only, so anything already in flight carries on as it was.
4.9 Storefront & exports
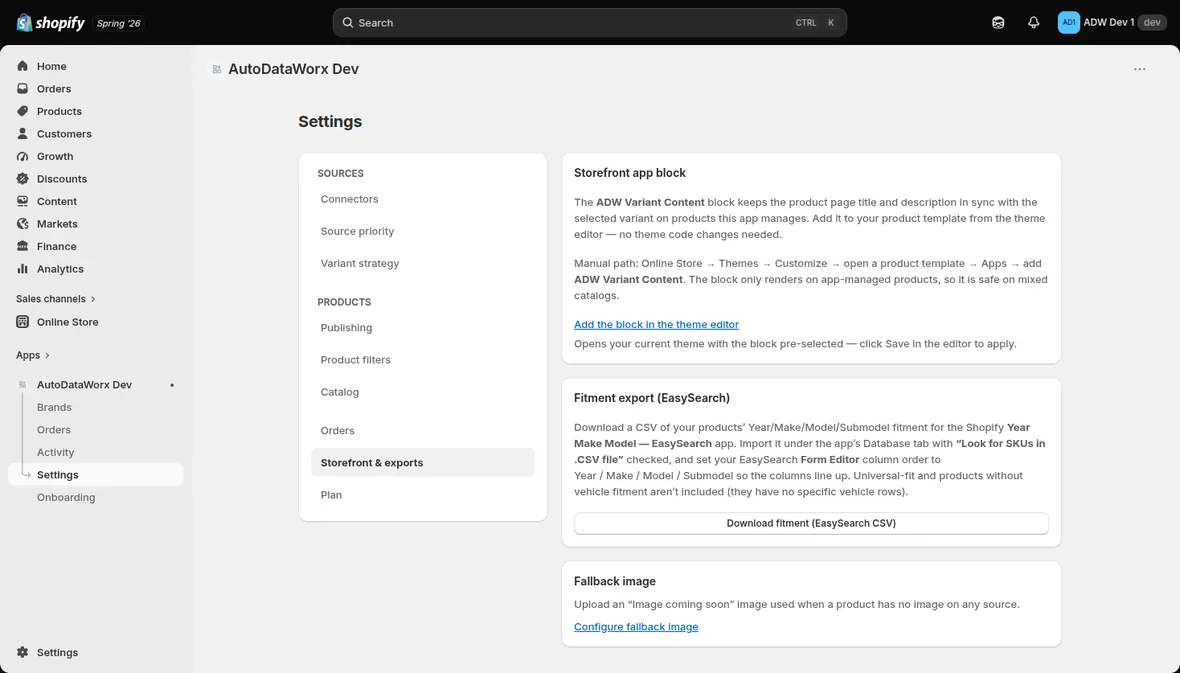
Storefront app block — the ADW Variant Content block keeps the product page title and description in sync with the selected variant, on products this app manages. It draws nothing of its own and only acts on app-managed products, so it's safe on mixed catalogs. Turn it on once per theme.
Turn on the app embed in the theme editor is the way to do it. It opens your current theme with ADW Variant Content pre-selected under Theme settings → App embeds; switch it on and click Save. An app embed has no position in the page, so there's no section to choose — it works on every theme and on every product template, including custom ones.
By hand: Online Store → Themes → Customize → Theme settings (the gear at the bottom of the sidebar) → App embeds → ADW Variant Content → Save.
Add the section block instead is the older placement, kept for stores that already use it. It adds the block to your product template as a section block — and because themes only accept app blocks inside certain sections (usually just the main product section), it can be dropped in far fewer places. Prefer the app embed. Having both switched on is harmless.
Fitment export (EasySearch) — Download fitment (EasySearch CSV) exports Year/Make/Model/Submodel fitment for the Shopify Year Make Model — EasySearch app. Import it under the app's Database tab with "Look for SKUs in .CSV file" checked, and set your EasySearch Form Editor column order to Year / Make / Model / Submodel.
Universal-fit products and products without vehicle fitment don't make it into the export, since they have no specific vehicle rows.
Fallback image — upload an "image coming soon" picture for products with no image on any source. Note that it doesn't satisfy the Require source images filter, which runs first.
4.10 Plan
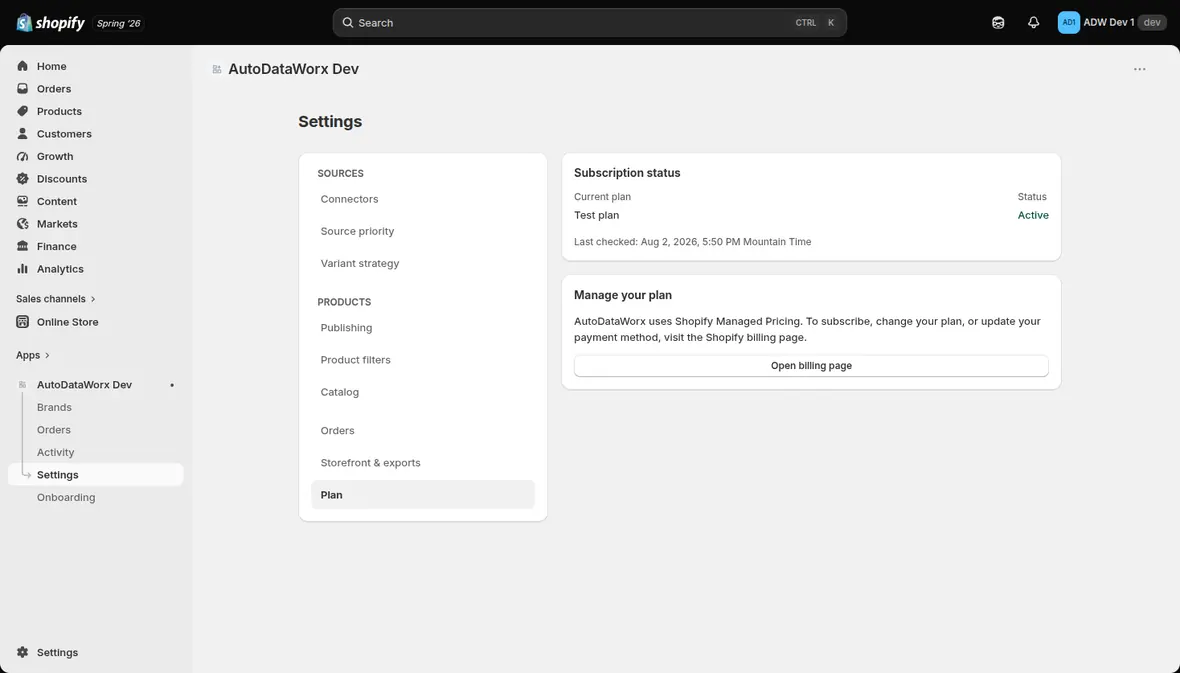
Shows your current plan, its status, and when it was last checked.
Open billing page takes you to Shopify's billing screen to subscribe, change plan, or update payment details. AutoDataWorx uses Shopify Managed Pricing, so every billing change happens on Shopify's side.
What differs between plans
Exactly one thing: how many distributors you can connect.
| Plan | Distributors |
|---|---|
| Basic | ASAP only |
| Plus | All supported distributors, as many as you like |
Everything else in this chapter is available on every plan — product filters, fitment filtering and limits, variant strategy, source priority, catalog settings, the storefront block, and both CSV exports. There is no feature-gated tier for those.
Neither plan includes submitting orders to your distributor; see §4.8.
If you're on Basic and downgrade from Plus, connectors beyond ASAP are paused, not deleted — their credentials and settings are kept, and upgrading re-enables exactly the ones the app paused. Connectors you disabled yourself stay off.
Chapter 05
Troubleshooting
Problems are grouped by what you're seeing. Start with the symptom.
Installation and access
The app opens on the plan screen and will not go further
Your subscription isn't active. Shopify blocks the app until a plan is approved. Reopen the app from Apps in the Shopify admin and approve one.
On a development store, paid plans show as "Unavailable on dev stores" and can't be selected. A store needs a paid Shopify plan before it can approve a paid app subscription.
"No active subscription" banner, and nothing syncs
Syncing pauses whenever there's no active plan. Go to Settings → Plan → Open billing page and resubscribe. Syncing picks up again on its own once the plan is active.
Blank screen or "page not found" from the install link
You were signed into a different store, or none at all. Sign into the right Shopify admin and reopen the link. If something still looks off, clear your browser cache.
Credentials and connectors
"We couldn't save your credentials"
Nearly always the wrong credential type. Distributors issue API credentials separately from the login you use on their website:
| Distributor | Needs |
|---|---|
| ASAP Network | API token (bearer token) |
| Turn 14 | Client ID + Client secret |
| Wheel Pros | SFTP username + password |
| MotorState | FTP username + FTP password + API key |
| Premier Performance | FTP username + FTP password |
If you don't have API credentials, ask your distributor account rep. The app validates on save, so credentials never end up stored in a broken state.
A brand I am entitled to does not appear in the list
Your entitlement list is cached from the last time the app read it. Go to Settings → Connectors and click Refresh entitlements on that connector.
Turn 14 connected but no pricing appears
Check the Environment switch on the Turn 14 connector in Settings → Connectors. The Testing environment is a sandbox and its data is patchy, with some brands carrying no pricing at all. Switch to Production for live data.
Products not appearing
Work down this list in order.
1. Is the brand actually syncing? Brands → check the brand's Sync switch is on and its status isn't Not syncing.
Check the row for "Enabling won't create products yet — no authorized source" while you're there. That's a Turn 14 purchase-authorization problem, not a sync one — see below.
2. Has the first sync run?
Activity → Recent sync runs. Enabling a brand triggers an import right away
(logged as manual.brand-enable). No run listed means the brand was never
enabled successfully.
3. Were the products filtered out? This is the most common cause by far. Go to Settings → Catalog → Download exclusions (CSV). It lists every excluded product with the filter reason and date.
4. Are they in Shopify as drafts? If Default product status is Draft, products sync but stay hidden. Check Shopify's Products list with the Draft filter. Change the default in Settings → Publishing, then use Apply — re-publish all products.
5. Are they published to a channel? If Auto-publish is off, or no sales channels are selected, products exist but show up nowhere. Both settings live in Settings → Publishing.
Products synced but have no price
Pricing follows the MAP → MSRP → markup-over-cost cascade. A product with none of those can't be priced. Check that:
- a source providing the Pricing capability is connected and ranked in Settings → Source priority
- Default markup over cost (%) is set, since it's the last resort in the cascade
Products synced but have no images
Some distributor brands genuinely ship zero images, and that's not a bug. Either enable Require source images in Settings → Product filters → Inventory to exclude them, or set a Fallback image in Settings → Storefront & exports.
Margin filter is holding products in "pending"
The Profitability filter needs cost data from Turn 14. Products without it sit in pending, neither archived nor published. ASAP-only products aren't affected by this filter.
A whole brand is stuck on "Pending first sync"
If you run a Fitment filter, this is usually not a sync failure. A product whose distributor sent no vehicle list and no universal-fit flag is held by default rather than published, and held products read as Pending first sync on the Brands screen.
When it's a whole brand at once, the distributor for that brand most likely sends no fitment data at all — in which case waiting won't help, because no future sync will supply it. The fix is the Products with no fitment data control on that brand's Filters → Fitment tab.
Note that held is not the same as excluded: held products are still candidates for a future sync, so they will not appear in your exclusions CSV. If a brand shows nothing in the exclusions report and nothing in Shopify, held is the state to suspect.
Chapter 6 covers this end to end, including why turning on "Treat them as universal-fit" can make things worse rather than better if Include universal-fit products is off.
A brand says "Not authorized — contact your rep"
Turn 14 separates two permissions: supplying you a brand's catalog data, and approving you to purchase from that brand. You can have the first without the second, which is why a brand can be visible and enableable while producing nothing.
The app tells you before you enable it rather than after. When every source backing the brand is unauthorized, the row reads "Enabling won't create products yet — no authorized source".
This is not something the app can fix. Contact your Turn 14 rep and ask to be approved for the brand, then run Refresh entitlements on the Turn 14 connector in Settings → Connectors so the app re-reads your status.
Note the badge is per source. A brand carried by both ASAP and an unauthorized Turn 14 still produces products — ASAP supplies them, and the rollup warning won't appear. ASAP, Wheel Pros, MotorState and Premier have no purchase authorization concept at all, so they never show a badge.
A brand ignored a filter change I made store-wide
Check whether that brand has its own override. On Brands → [brand name] → Filters, a family showing an Active badge is using the brand's own rule and ignoring your store-wide setting for that family entirely — brand rules replace the global filter, they don't merge with it.
For Fitment specifically, the tab shows a vehicle count comparison ("This brand: 12 · Global: 15") that turns amber when the brand's list has drifted from your global one. Copy global list again re-syncs it. See Chapter 4.
Either way, finish with Apply — re-sync <brand> so the change reaches products that are already synced.
Sync behavior
How do I force a fresh import from the distributor?
Mostly you can't, and mostly you shouldn't need to. Distributor data is re-fetched on your sync cadence (Settings, set during wizard Step 5), and whenever you enable a brand that's never been imported.
Re-sync to Shopify on the Activity screen re-projects the catalog the app already holds; it doesn't re-fetch from the distributor. Use it after changing publishing or filter settings.
A sync run shows errors
Open Activity → Recent sync runs for the error count per run, and the Activity log view for the detail. Transient distributor timeouts get retried automatically. Persistent errors on one source usually mean expired credentials, so check the connector's health in Settings → Connectors.
A brand's prices stopped updating, but everything else syncs
Check Price sync on that brand's Pricing tab (Brands → the brand → Pricing). If the switch is on, price and compare-at price are being deliberately held for that brand while titles, images, inventory and fitment keep syncing normally — which is exactly the symptom.
Turn the switch off and Save. That only lifts the hold; it does not re-price anything on its own. To pull distributor pricing back in, click Re-sync now on the same tab, which replaces any prices you edited by hand. Prices can take 30 minutes or more to appear.
If price sync is already off for that brand, the cause is elsewhere — see Products synced but have no price.
A distributor stopped supplying a brand I still sell
If a brand is still syncing but one of its distributors no longer contributes, open the brand's Sources button on the Brands list and check that distributor's switch. A source switched off there stops feeding that brand's product data, while the brand itself carries on from its other sources.
Two related settings worth checking if you never switched it off yourself:
- The connector's New brands setting (Settings → Connectors). If it's set to Only brands I select, that connector will not pick up newly enabled brands on its own — you turn it on per brand.
- Purchase authorization, which is a different thing entirely. See A brand says "Not authorized — contact your rep".
Switching a source back on doesn't rewrite existing products; it takes effect at the brand's next sync.
Changing a filter did not remove existing products
Saving a filter changes it for future syncs only. To apply it to what's already in your store, use Apply — re-sync all brands (Settings → Product filters) or Apply — re-sync <brand> on a single brand's Filters tab. Both run in the background and can take several minutes.
Collections
A collection was created but is empty on my storefront
Almost always because the products in it are Drafts. A Shopify smart collection has no rule for product status, so it cannot exclude Drafts — the collection is created, published, and matches products that shoppers can't see.
Nothing is broken and nothing needs recreating: publish the products and the collection fills itself. The preview in Settings → Collections flags this before you create anything, showing "none visible yet — all drafts" or "88 visible" on the affected lines.
If the products are Active, give it a minute. Shopify evaluates smart collection membership asynchronously, so a collection reads as empty for a short while immediately after creation.
A collection I wanted shows "already exists, will be skipped"
You already have a collection whose handle matches. The app deliberately will not
touch a collection it didn't create — creating one anyway would either duplicate
yours under a -1 handle or silently do nothing, and both make the count on the
button a lie.
If you want the app's version instead, rename or delete yours in Shopify first, then reload the Collections section.
I deleted a collection and it came back
It didn't — the app creates collections once, on your explicit click, and never recreates them. If a collection reappeared, it was created by a second run where it was ticked again. Deleted collections show as available candidates again precisely because we no longer have one on record.
Nothing appears in the Collections preview
Either your catalog has no vehicle-make or product-type data recorded yet, or the products haven't re-synced since the app started collecting it. The coverage line above the list tells you which — "Based on 4,102 of 6,730 synced products". That number grows on its own as products re-sync, so a low figure means "not observed yet", not "your catalog is empty".
I want collections for a specific vehicle, not just a make
Turn on Emit make-model fitment tags in Settings → Product filters. That
adds a combined tag like make-model:ford-f-150 you can write your own Shopify
collection rule against. It's independent of the Collections section — see
Chapter 4. Note it counts
against your fitment tag limit.
Variant grouping
The Variant grouping option isn't offered for a brand
The tab explains rather than greying out: this brand's distributor doesn't supply the information needed to work out which part numbers belong on one product. With nothing to group by, there's no choice to make, and the brand's products are always listed individually. Nothing you can change in the app affects this.
Product links broke after I changed variant grouping
Expected, and it was in the confirmation. Shopify cannot reshape a product's option structure in place, so switching layouts archives every product in the brand and creates replacements with new URLs. Manual collection membership, hand-set Active/Draft status, reviews, and channel listings don't carry over either.
The old products are archived, not deleted, and past orders are unaffected. If you need them back, contact support before you empty your archived products.
Set variant grouping on a brand before enabling it and none of this happens — with no products yet, there's nothing to rebuild.
A rebuild seems stuck, or I want to start another
Only one rebuild runs per brand at a time; starting a second gives you "A rebuild is already running for this brand". Progress is shown on the brand's Publishing tab but doesn't update on its own — reload the page to refresh it.
Products are archived and recreated one at a time, deliberately, so your storefront is never missing the whole brand at once. On a large brand this takes a while. Products the app couldn't archive are counted separately and left exactly as they were.
Orders
An order is sitting on the Orders screen
That screen only shows orders that need a decision. The reason will be one of:
- the preference chain was exhausted, so no source could fill it
- a fatal distributor failure
- a missing recipient phone number
- it couldn't be classified to a shipping method
- it's held pending regulatory-attestation consent
Approve it, re-route it to a different source, or adjust quantities from the order.
Orders are not being submitted to my distributor
This is expected. Distributor order submission is not included in the plans currently offered, so the app evaluates each order and works out which source could fill it, but never transmits it — not automatically, and not through the manual approve or re-route actions either.
Fulfill the order in Shopify as you normally would. The app picks that up on its next reconciliation pass and clears its internal hold. Those held orders don't appear on the Orders screen, so there's nothing to chase inside the app.
See Chapter 4. If you were expecting automatic distributor submission, that arrives with the orders rework.
Two unrelated things that also hold an order, both by design: Manual order processing being on (they wait for your review), and unpaid or pending-payment orders (they always hold).
An order went to the wrong distributor
Fulfillment is decided in this order: stock threshold, brand override, source exclusion, then lowest wholesale cost. To pin a brand to one distributor, use Brand override on that brand's Fulfillment tab.
Fitment
A product has wrong or missing vehicle fitment
Open the brand → Filters tab → click the product row, then add manual year-make-model rows. Manual fitment is merged with the distributor's data rather than replacing it.
A vehicle the part fits isn't showing on the storefront
Open the product's fitment editor and read the Preview pane — it itemizes every step that dropped rows. There are three possibilities:
- Excluded by your fitment filter. The row carries a Filtered out badge. Your filter trims out-of-filter vehicles off a product even when the product itself passes, so a Chevrolet-only rule strips the Ford rows from a part that fits both. Widen the filter in Settings → Product filters, or on the brand.
- Over the entry cap. Maximum fitment entries per product (default 200) bounds the fitment data. Remember entries count per model year, so one "2000–2024 Ford F-150" application spends 25 of them.
- Over the tag cap. Maximum fitment tags per product (default 50) bounds
the distinct
make:/model:tags, which is what collection rules match on. A part can therefore carry correct fitment data while not surfacing in a collection.
Raise the relevant limit in Settings → Product filters → Fitment limits. Both are documented in Chapter 4.
A Turn 14 product shows no fitment in the editor
Fixed on 2026-08-03. The editor derived fitment from the raw product payload, but Turn 14 delivers pre-resolved fitment separately, so Turn 14 products reported zero rows here while the sync published hundreds. The editor now reads that data. If you still see zero rows on a Turn 14 product, the distributor genuinely has no fitment for that part.
Fitment is not showing on my storefront
Fitment is written to the adw.fitment product metafield and as derived tags.
Displaying it takes either a theme that reads the metafield, or the EasySearch
integration — export via Settings → Storefront & exports → Download fitment
(EasySearch CSV).
Universal-fit products and products with no vehicle fitment are left out of that export, because they have no specific vehicle rows.
Variant content does not change when a customer picks a variant
Turn on the ADW Variant Content app embed for the theme that's published: Settings → Storefront & exports → Turn on the app embed in the theme editor, switch it on, then Save in the theme editor.
It's per-theme, so a theme you switched to recently — or a duplicate you made to test something — needs its own toggle. If the storefront still doesn't swap after saving, check that you turned it on for the published theme and not a draft.
Getting help
When you contact support, include:
- your store domain
- the app version from the bottom of the Home page
- the timestamp of the relevant run from Activity
- the exclusions CSV, if the question is "why isn't this product here?"
Chapter 06
Fitment filters
This chapter is a deep dive on one specific situation: what happens to a product when your distributor sends no vehicle-fitment data for it at all. Chapters 2, Step 4 and 4 cover the Fitment filter itself; this chapter covers the setting most merchants never touch until a whole brand gets stuck on Pending first sync.
6.1 What "no fitment signal" means
Some distributor feeds carry a vehicle list per part (Year/Make/Model rows), some carry an explicit universal-fit flag, and some carry neither. A product with no rows and no universal flag is what the app calls "no fitment signal" — the distributor told us nothing, one way or the other, about what it fits.
This is a real, common state, not an error. Turn 14 sends no universal-fit flag at all, so any Turn 14 part with an empty vehicle list lands here. Distributors whose feed carries no fitment data of any kind — see 6.3 — put every one of their products here.
If you don't run a Fitment filter, none of this applies: everything syncs. The three-way choice below only matters once you enable a Fitment filter, because that's the point where the app has to decide what to do with a product it has no vehicle data for.
6.2 Your three options
Open a brand's Filters tab (or Settings → Product filters for the store-wide default) and go to the Fitment tab. Below the vehicle list is a control called Products with no fitment data, with three options:
| Option | What happens |
|---|---|
| Hold them until fitment data arrives (default) | The product is held — it does not publish, and shows as Pending first sync on the Brands screen. Recoverable: if the distributor later sends real fitment data, or you change this setting, it re-evaluates normally. |
| Treat them as universal-fit | The product is treated exactly like a distributor-confirmed universal-fit part (see 6.4 before you pick this — it does not always mean "publish"). |
| Don't publish them | The product is excluded outright, the same as failing any other filter. It shows in your exclusions report (Chapter 4), not as pending. |
Held and excluded are different outcomes in the app, and it's worth knowing which one you're looking at: held products are still candidates for a future sync (nothing about them failed permanently), excluded products were evaluated and rejected. The exclusions CSV (Settings → Catalog → Download exclusions) only lists the excluded ones.
The default is Hold, on purpose — it's the same behavior the app has always had for a no-signal product, so turning on a Fitment filter for the first time never silently removes anything you didn't already know about.
6.3 Distributors with no fitment data at all
Most distributors send fitment for at least part of their catalog. A few send none — their feed simply has no vehicle-fitment column or API endpoint to read. MotorState is the clearest example: nothing in its catalog file, nothing in its API, for any part, of any brand.
For a distributor like that, "no fitment signal" isn't a handful of parts — it's the whole catalog. If you run a Fitment filter with Products with no fitment data left on its Hold default, products that only that distributor carries sit on Pending first sync and stay there. That's expected behavior, not a sync failure — but it's easy to mistake for one the first time you see it, so it's worth knowing in advance rather than discovering it while filing a support ticket.
When another distributor carries the same part
There's an important exception, and it's why products from one distributor can appear to behave inconsistently. When two distributors carry the same part, the app matches them together — and fitment data is held against the matched part, not against each distributor's copy of it. So if one of your other distributors sends fitment for that part, the Fitment filter has real data to judge it on, even though the distributor you're looking at sent none.
That splits a no-fitment distributor's catalog in two:
| What the Fitment filter sees | Typical outcome | |
|---|---|---|
| Parts only that distributor carries | No fitment data at all | Held on Pending first sync under the Hold default |
| Parts another distributor also carries | That distributor's fitment data | Published or excluded on the merits, like any other part |
In a live test of MotorState against a catalog that already ran Turn 14 and ASAP, two thirds of MotorState's parts matched an existing part and were judged on the other distributor's fitment; only the remaining third had no fitment anywhere and held.
The practical consequence: for the parts only that distributor carries, "hold until fitment data arrives" means holding indefinitely — no later sync will supply it, because the distributor doesn't have it to send. Changing Products with no fitment data is the only thing that releases them (read 6.4 first).
If a brand shows a large number of products stuck on Pending first sync right after you connect a new distributor, check whether that distributor sends fitment data before assuming something is broken. Settings → Connectors doesn't currently label which distributors carry fitment data; when in doubt, check that brand's exclusions/pending list against what you'd expect.
6.4 The universal-fit trap: two settings, not one
Read this before switching "Products with no fitment data" to "Treat them as universal-fit." It interacts with a second, separate setting on the same tab — Include universal-fit products — and the combination can do the opposite of what you'd expect.
"Treat them as universal-fit" doesn't publish a product by itself. It reclassifies the product as universal-fit, and universal-fit products are then subject to the Include universal-fit products switch, exactly the same as a part your distributor explicitly flagged universal. If that switch is off, a product just reclassified as universal-fit gets excluded, not published.
So the two settings only do what you want together:
| Include universal-fit products | Products with no fitment data | Net effect on a no-signal product |
|---|---|---|
| Off | Hold (default) | Held — "Pending first sync" |
| Off | Treat as universal-fit | Excluded — moved from held to gone, likely not what you wanted |
| On | Treat as universal-fit | Published, tagged universal-fit |
| (either) | Don't publish them | Excluded |
If your goal is to get a distributor's no-signal products published, you need both: "Treat them as universal-fit" and "Include universal-fit products" turned on. Turning on only the first one, with the second left off, moves those products from held to excluded — fewer products visible in your store, not more.
6.5 A brand-scoped override, not a global change
Because a shift like this affects every no-signal product a brand's distributor(s) contribute, most merchants apply it to one brand, not the whole store: open that brand's page (Brands → [brand name]), go to its own Filters tab, and set both Products with no fitment data and Include universal-fit products there. Other brands are unaffected.
One thing to understand before you save it, because it surprises people: a brand override is a complete replacement of the store-wide Fitment filter for that brand, not a per-field tweak layered on top of it. The moment you save anything on a brand's Fitment tab, that brand stops reading your store-wide Fitment settings entirely — including the fields you never touched. This is covered in full, for every filter family, in Chapter 4.
The app does two things to keep that from biting you:
- It prefills the brand editor from your global filter the first time you open it, and says so: "Prefilled from your global fitment filter (N vehicles). Saving applies this list to this brand only — later changes to the global list will not follow." So saving a one-field change keeps the vehicle list you already had, rather than silently dropping it.
- It shows a running count — "This brand: 12 · Global: 15" — which turns amber when the two have drifted apart, with a Copy global list again button to re-sync the vehicle list from global.
That prefill is a snapshot taken at save time, not a live link. Edit your store-wide vehicle list afterwards and the brand copy keeps the old one until you press Copy global list again.
Apply the change with Apply — re-sync <brand> on that brand's Filters tab (Chapter 4) so it takes effect on products already synced, not just future ones.
6.6 Why we don't do this for you automatically
For a brand like wheels, "no fitment signal" and "genuinely fits every vehicle" are close enough that some connectors default new products from that category to universal-fit automatically. AutoDataWorx does not do this for every distributor, and deliberately not for MotorState: a shock or a brake component fits specific vehicles, not all of them. Marking it universal-fit when we don't actually know that would surface it in a Year/ Make/Model search for every vehicle a customer enters — a worse experience for your customers than the part simply being held until you decide. That's a product decision we're leaving to you, brand by brand, rather than a gap we forgot to close.